The Import
Why use Imports?
In addition to adding them manually, new templates, devices, private customers, corporate customers and employees can be imported onto your platform by uploading CSV (Comma Separated Values) files. This provides the following advantages:
- Multiple entities can be added and/or updated at the same time.
- Existing data from CRM or ERP systems does not have to be re-entered manually.
Possible Use Cases:
- Migrating existing data from other systems to the platform.
- Adding large numbers of new entities on a regular basis.
- Updating multiple entities at the same time.
Import Modes
Depending on the desired result of the import - creation and/or update - you need to select the appropriate import mode. For each mode, there are a few details that you need to keep in mind when preparing your import data.

Create All
- Only for creating new entities.
- Depending on the type of entity, there are different mandatory fields which require data input (see tables below).
- For each correctly formatted row in the imported CSV file, a new entity is created.
- Tip: You can create new devices and new codes, which are automatically paired with each other, in just one import by entering _createNew in the objectTag column.
Create & Update
- For creating new entities and updating existing entities at the same time.
- An identifying field is required to distinguish between new and existing entities.
- A new entity is created for each correctly formatted row in the imported CSV file that does not have an entry in the identifying field.
- Warning: If the same CVS file is used for another import without the IDs of the newly created entities being entered in it, for each row without ID, entities will be created again (picture)!
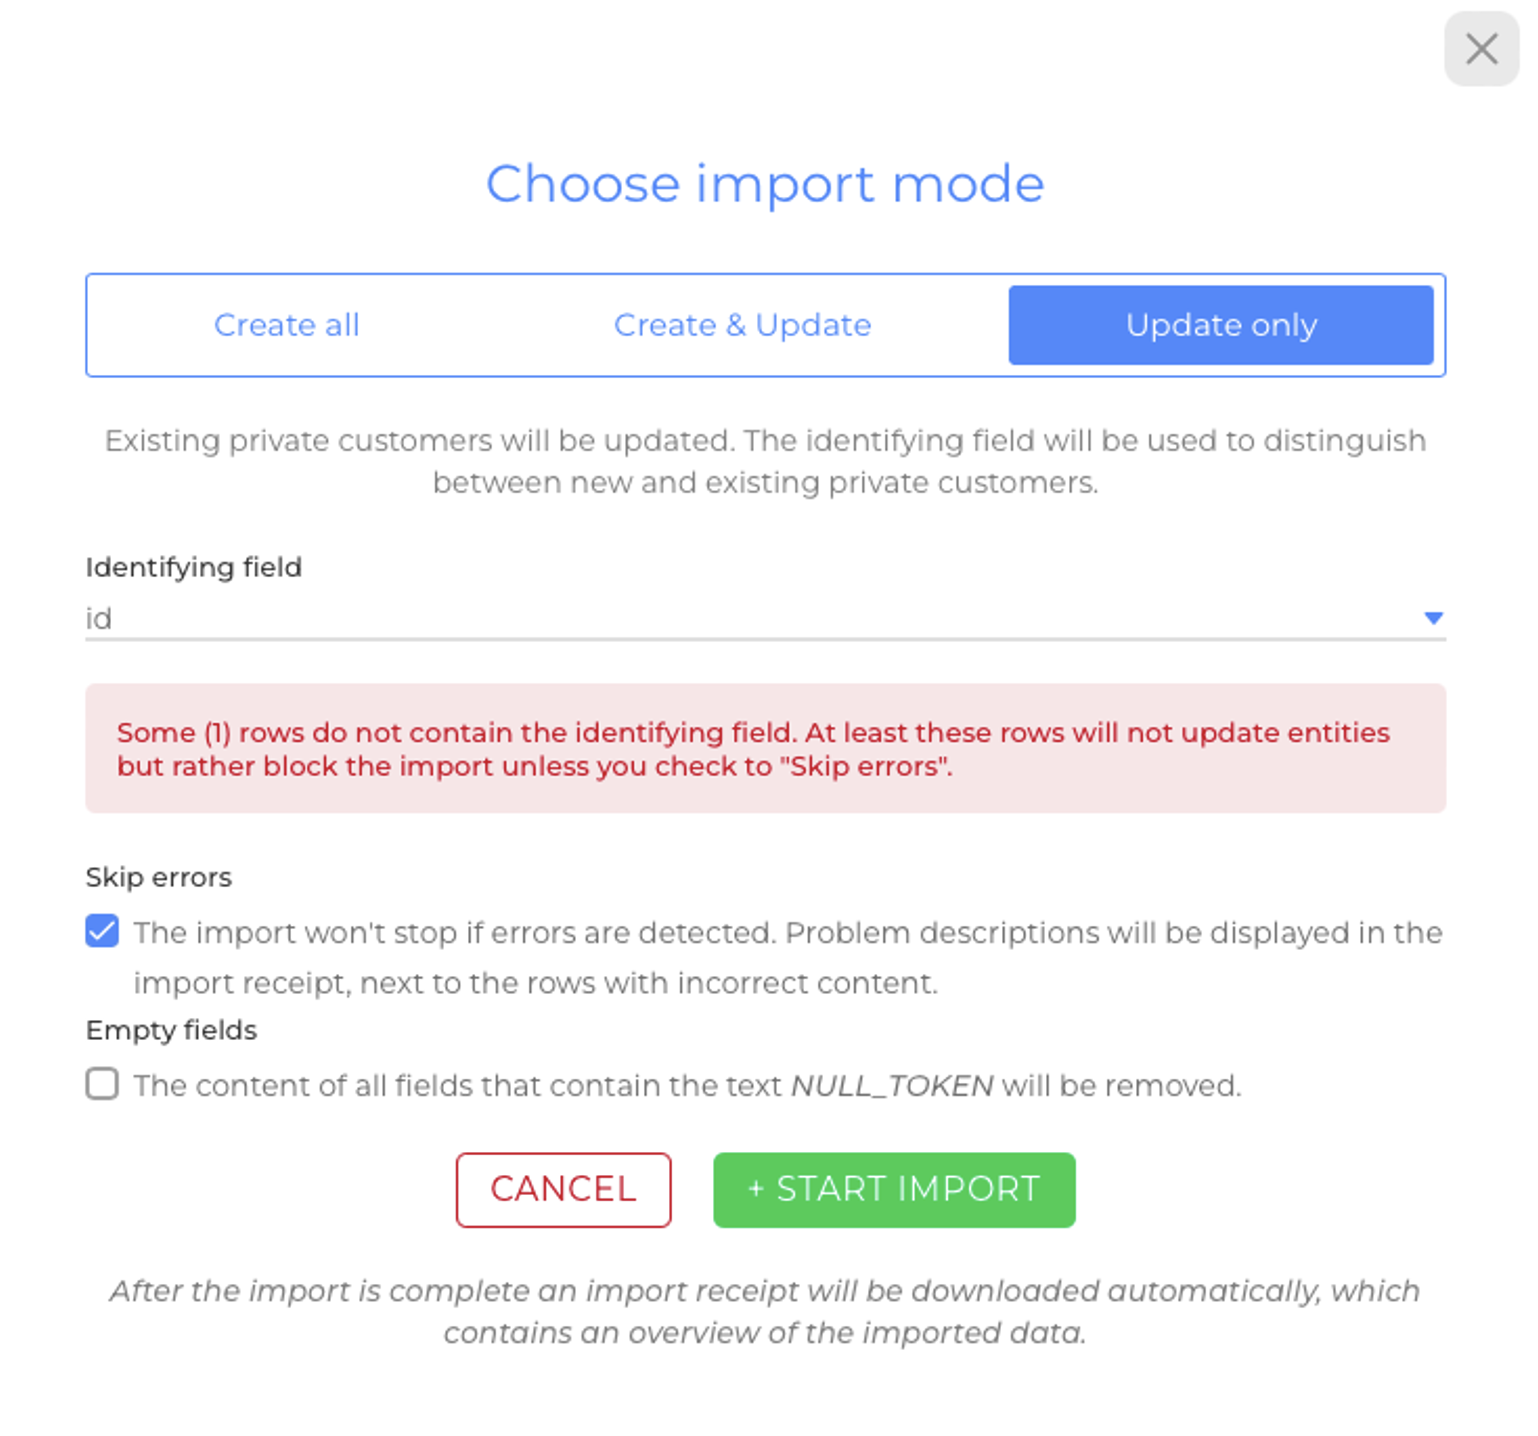
Update only
- Only for updating existing entities.
- An identifying field is required to distinguish between new and existing entities.
- Existing entities will be updated, and new ones will be ignored, if the "Skip Errors" option was selected (picture).
When updating employees via import, previously invited employees will not receive a new invitation, unless this is explicitly triggered through a dedicated command.
This prevents multiple invitation emails from being sent to the same employee unintentionally.
This behavior applies specifically to employee data imports using the Create & Update or Update only mode.
Import Settings
Skip Errors
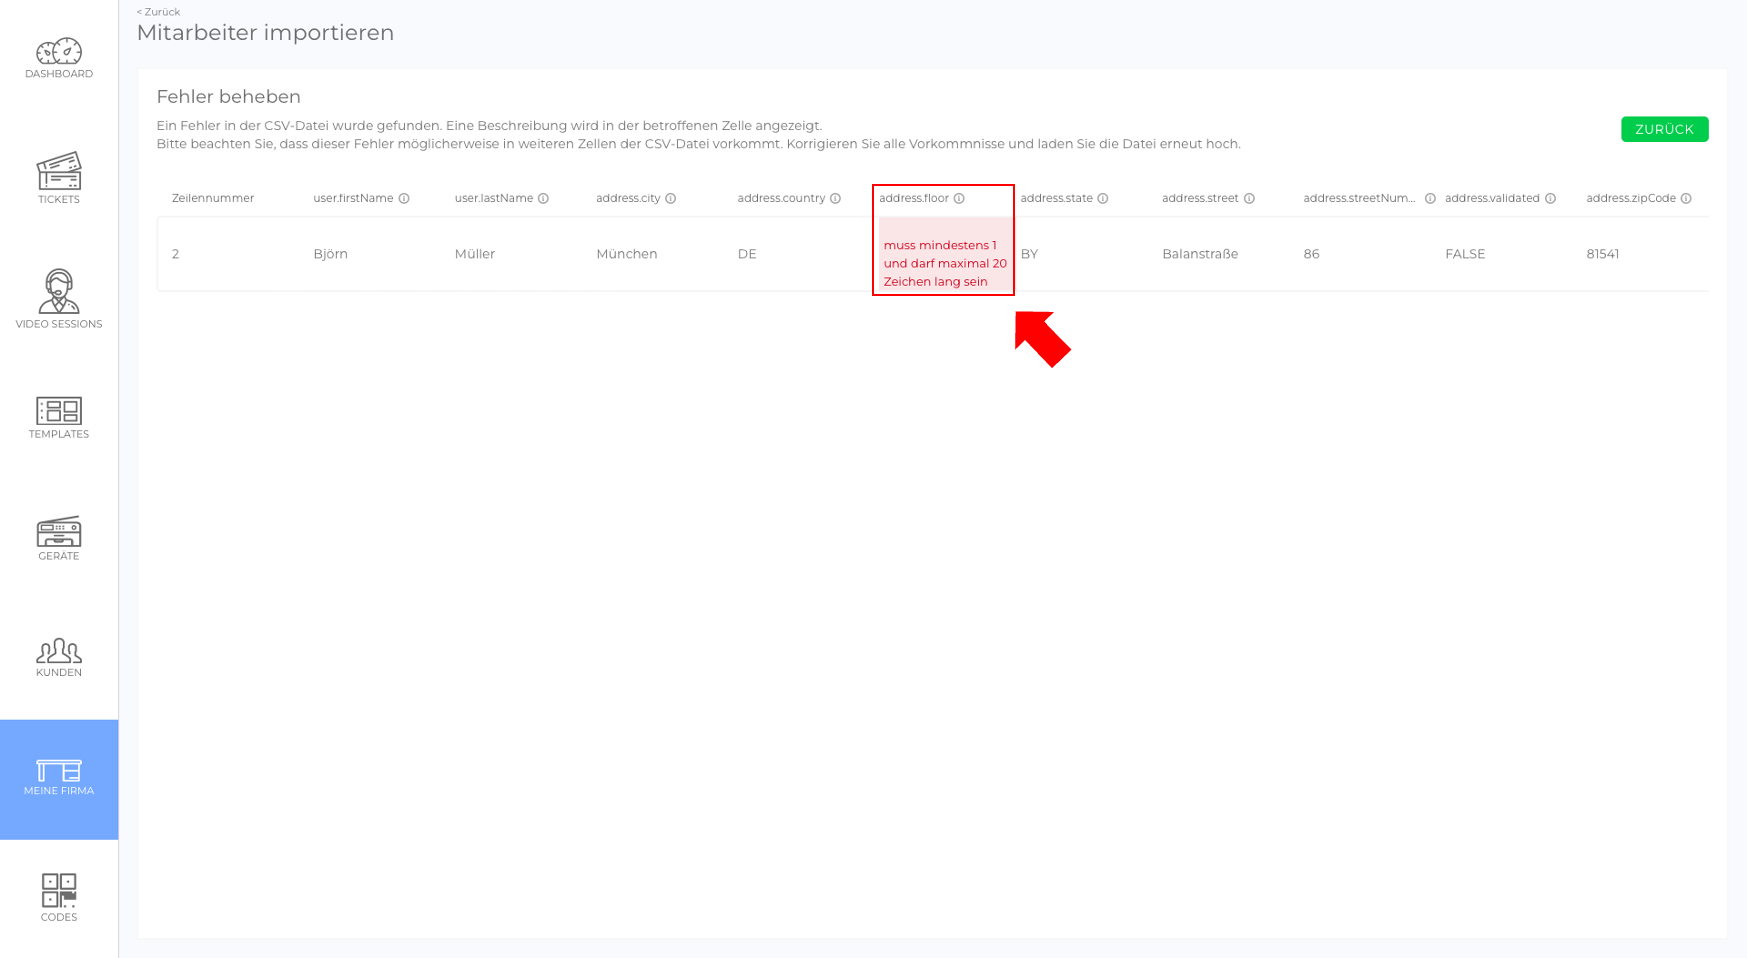
You can set the system to continue the import even if errors are detected. After the import is complete, an import receipt will be downloaded automatically. In the import receipt, problem descriptions will be given next to rows with incorrect content.
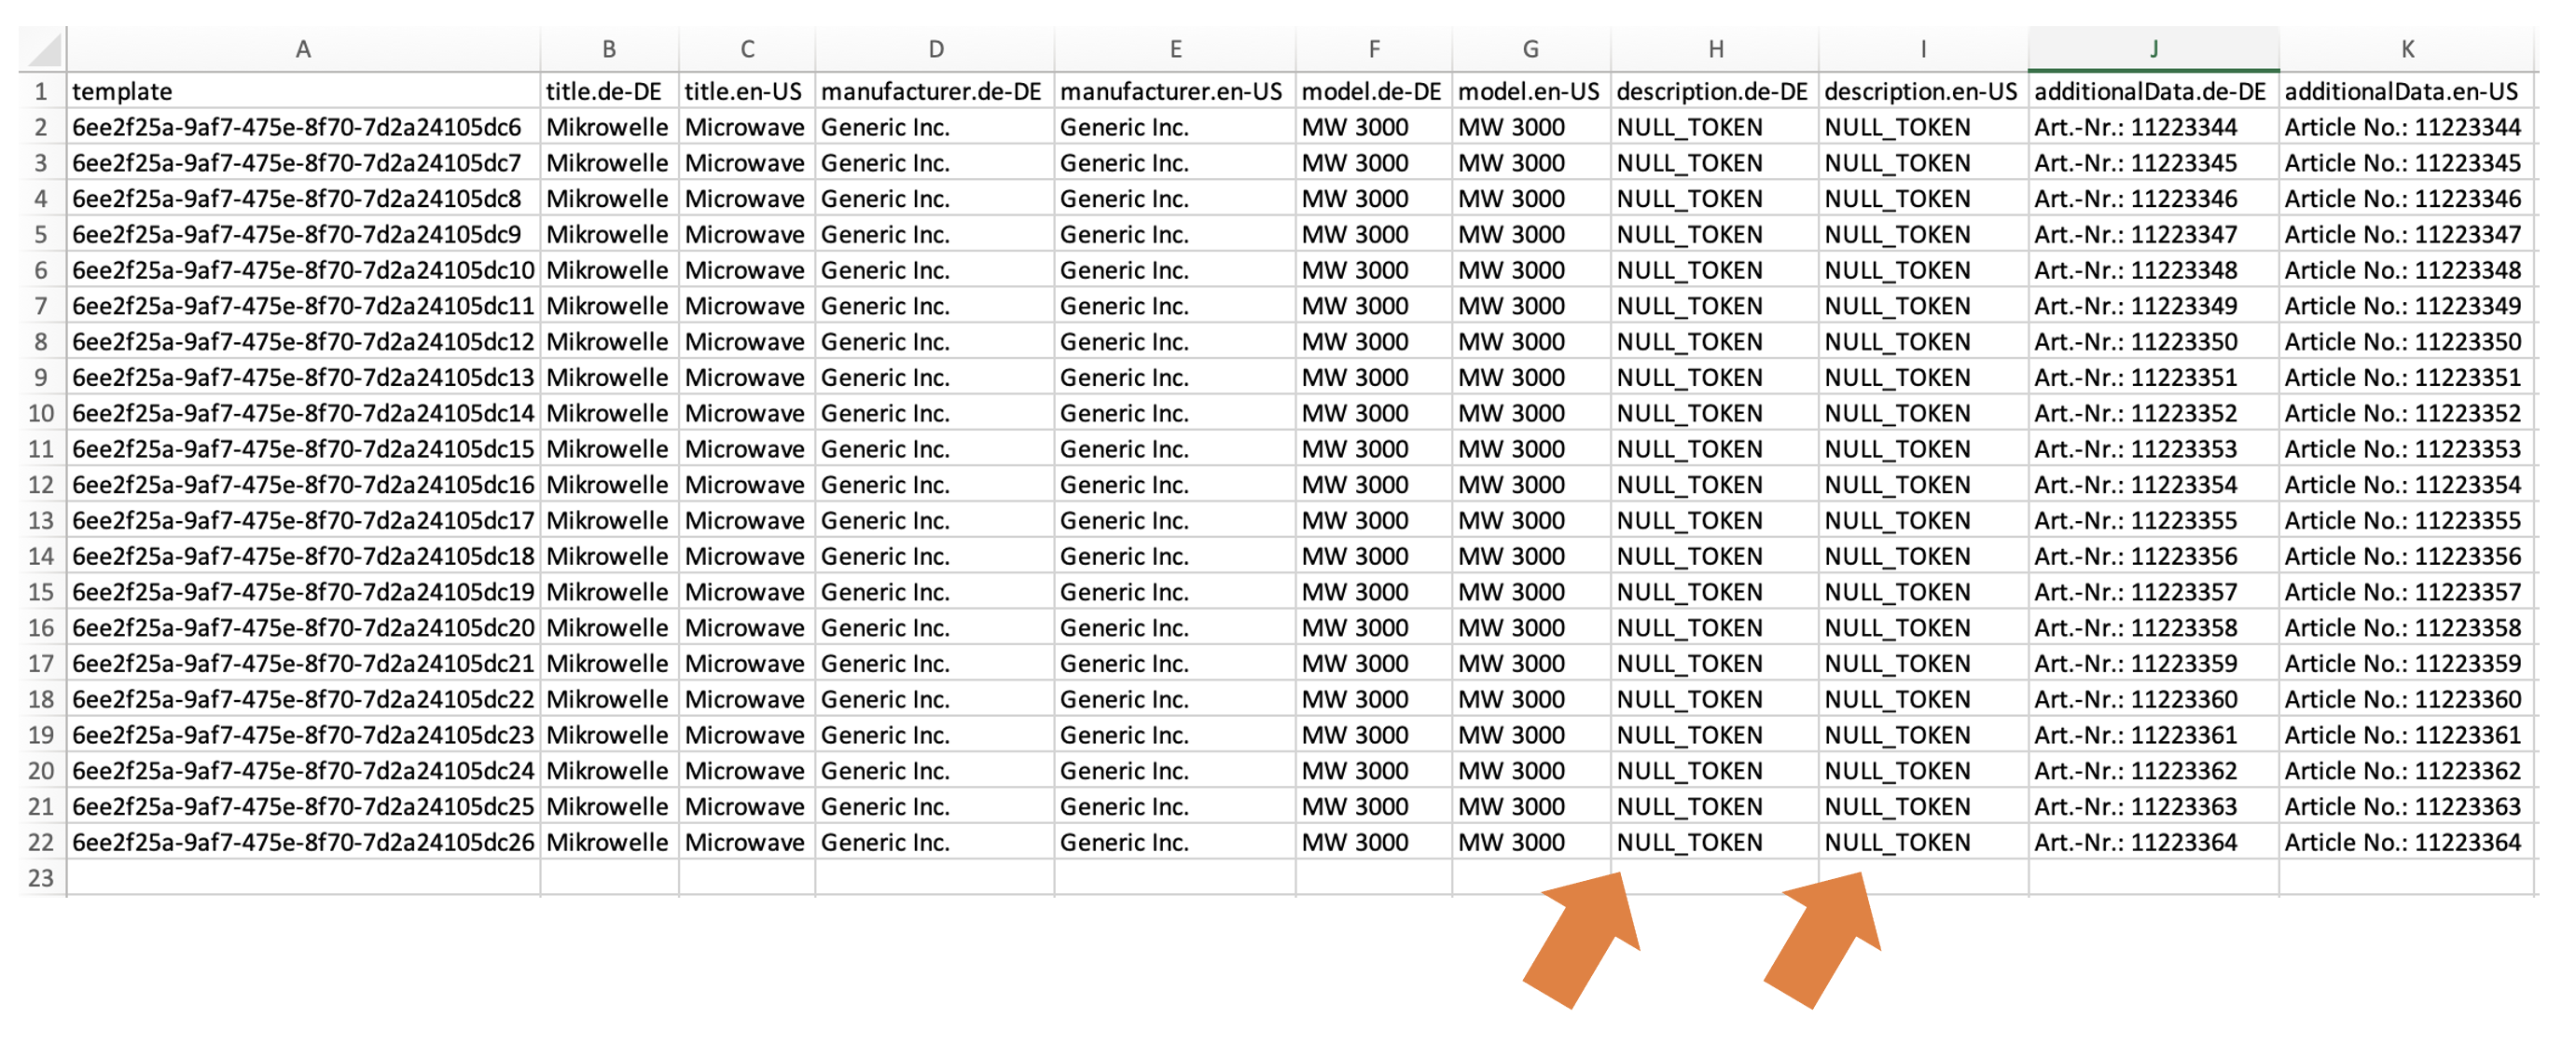
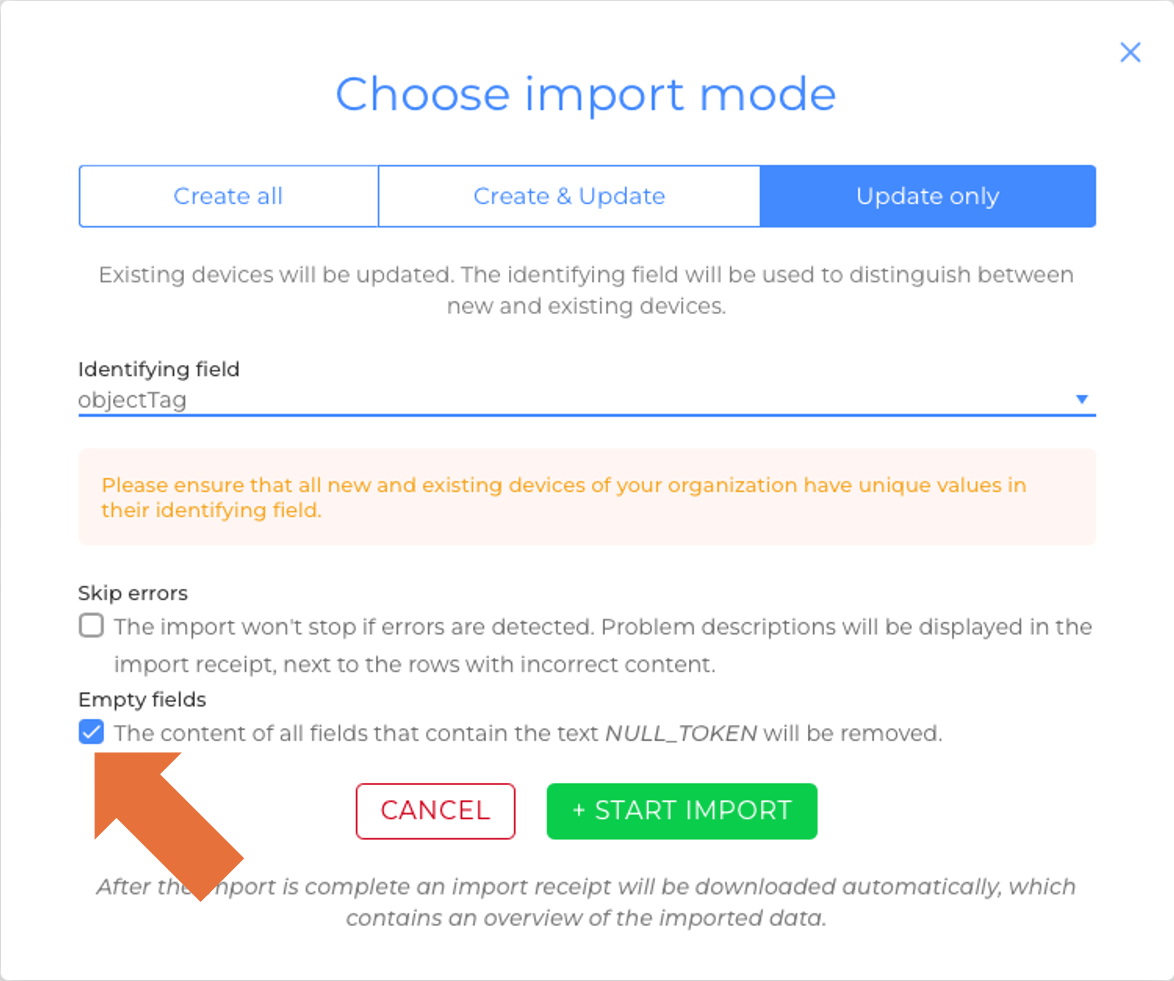
Empty Fields (for updates only)
You can have the system remove content from existing entities. To do this, enter the text NULL_TOKEN in the input fields that you want to empty and activate the checkbox (picture)(picture).
Step-by-Step Instructions
- Select Templates / Devices / Customers / My Company (Employees and Teams View) from the side menu.
- Click + Create Template / + Create Device / + Create Customer / + Add Employee.
- Click + Import / + Import Corporate Customers / + Import Private Customers / + Import Team Mappings / + Import Teams.
- Click Upload CSV and select a CSV file, or drag & drop it into the text field.
- Review the data to make sure it has been read correctly.
- Click Next.
- Choose an import mode and the desired import settings.
- Click + Start Import.
Depending on the number of entities on your list, the import may take up to 10 minutes. After the import is complete, an import receipt will be downloaded automatically. The import receipt contains an overview of the imported data, and if errors were found, problem descriptions are given next to rows that contain incorrect content.
The number of entities that can be created or updated per import is limited to 5000.
CSV File Formatting
It is important that your import files are formatted according to the specifications, otherwise your data cannot be imported. A specific file format is required for each type of entity (Templates, Devices, Corporate Customers, Private Customers, Employees).
Creation: Download a sample file and adapt it to your needs.
Update: Export a list and make your changes in it.
Templates
Sample file download:
Example (EN+DE):
Input Data in Excel (picture)
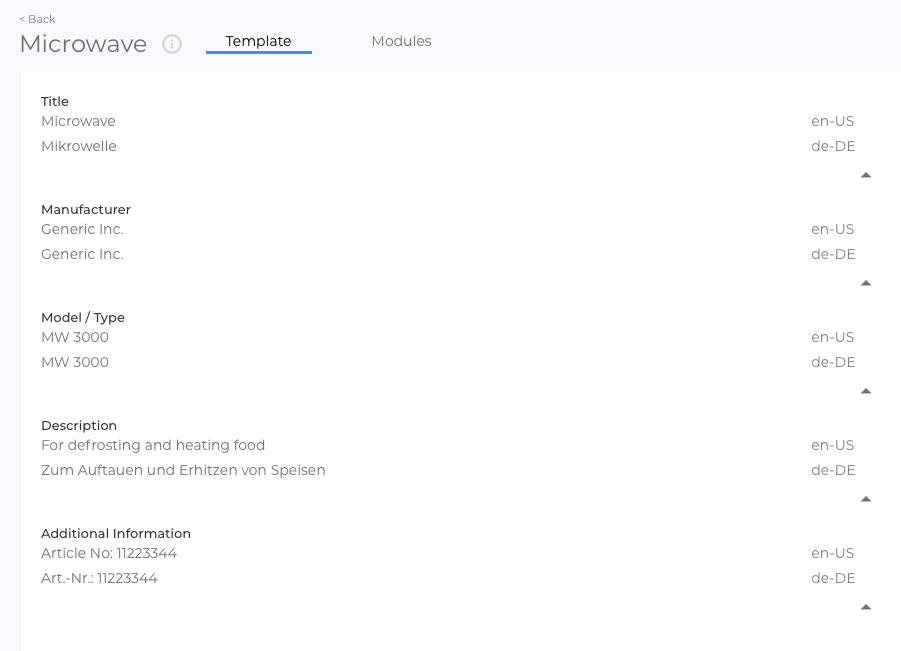
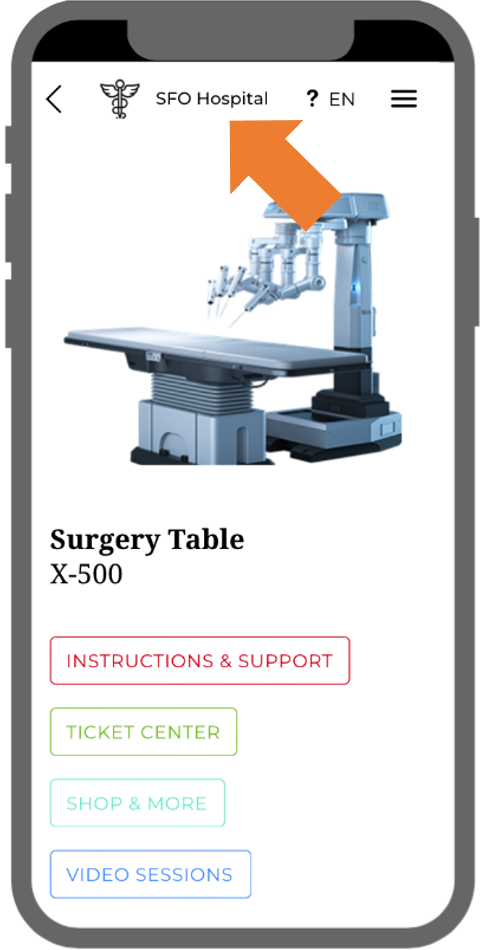
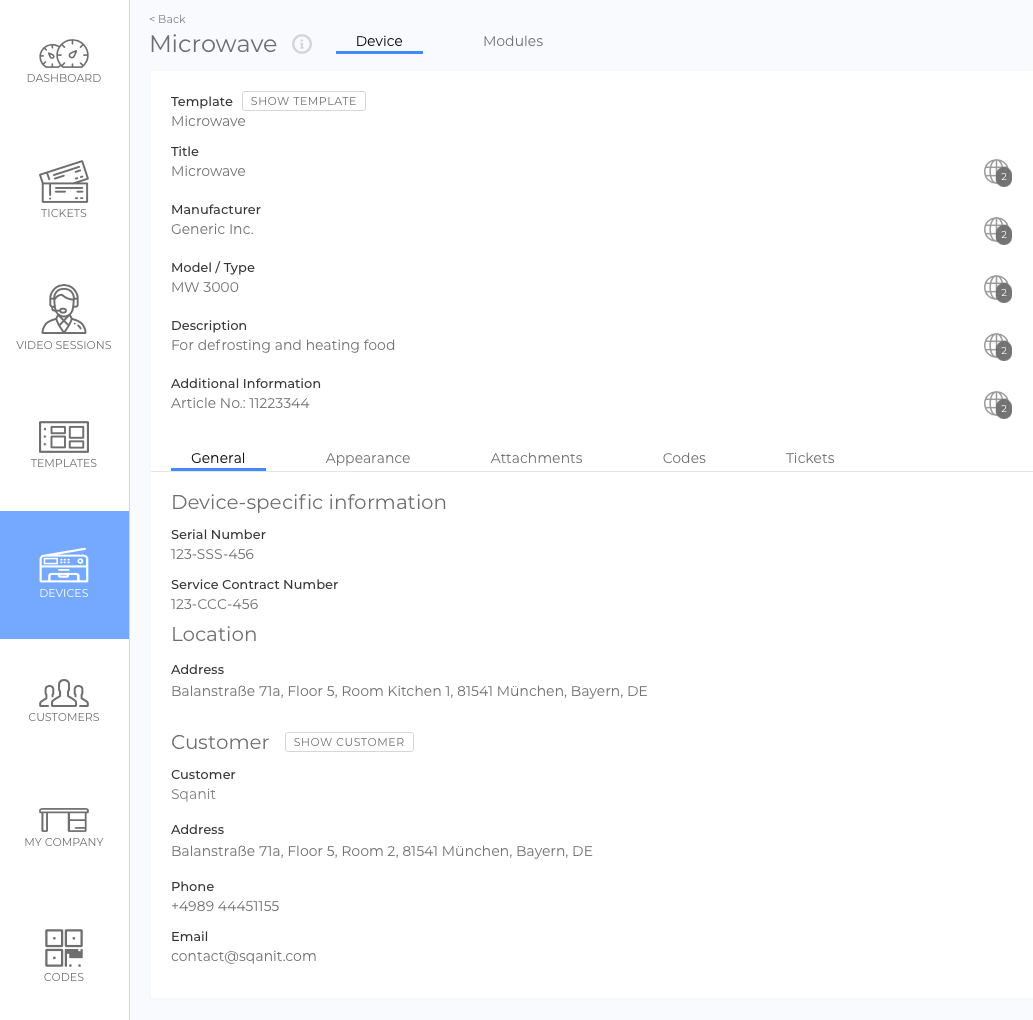
Result after Import (picture)(picture)
| Column Title | Input Data Example | Corresponding Input Field |
|---|---|---|
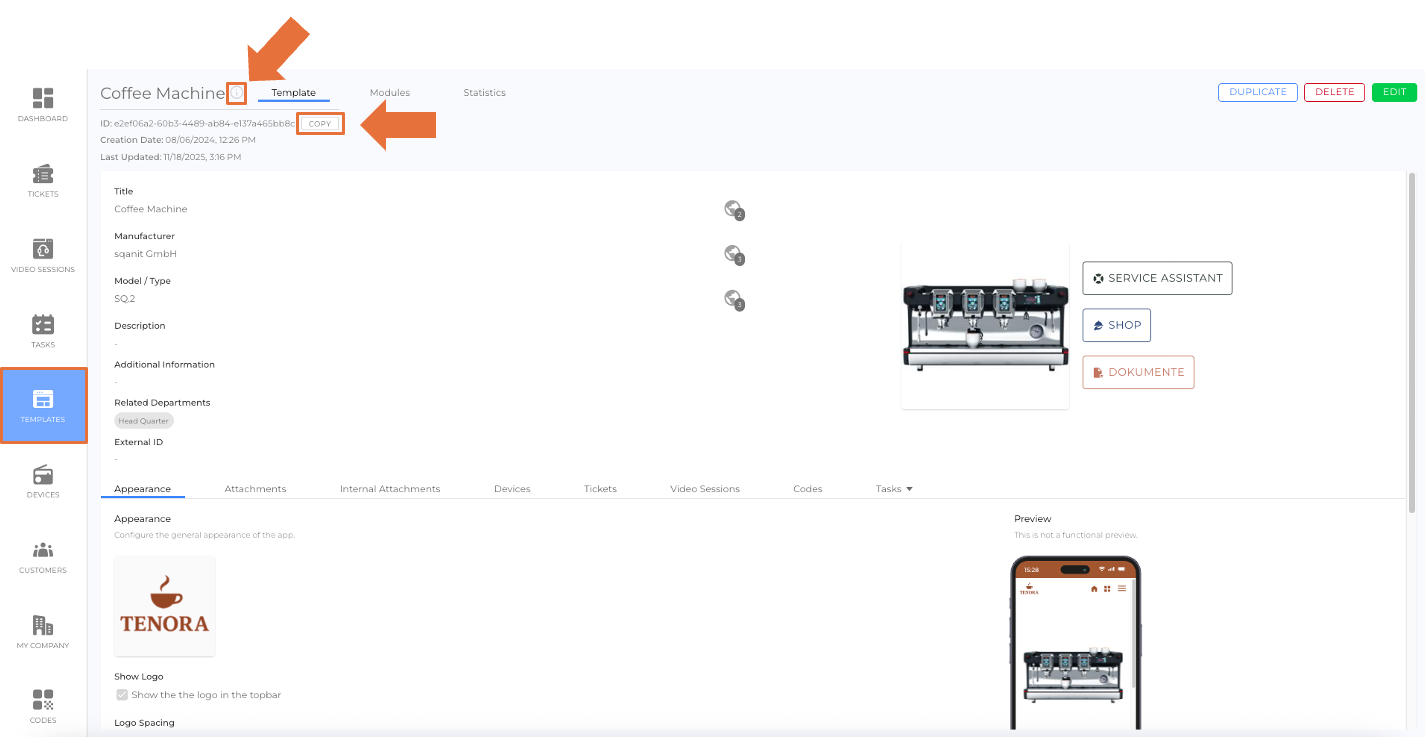
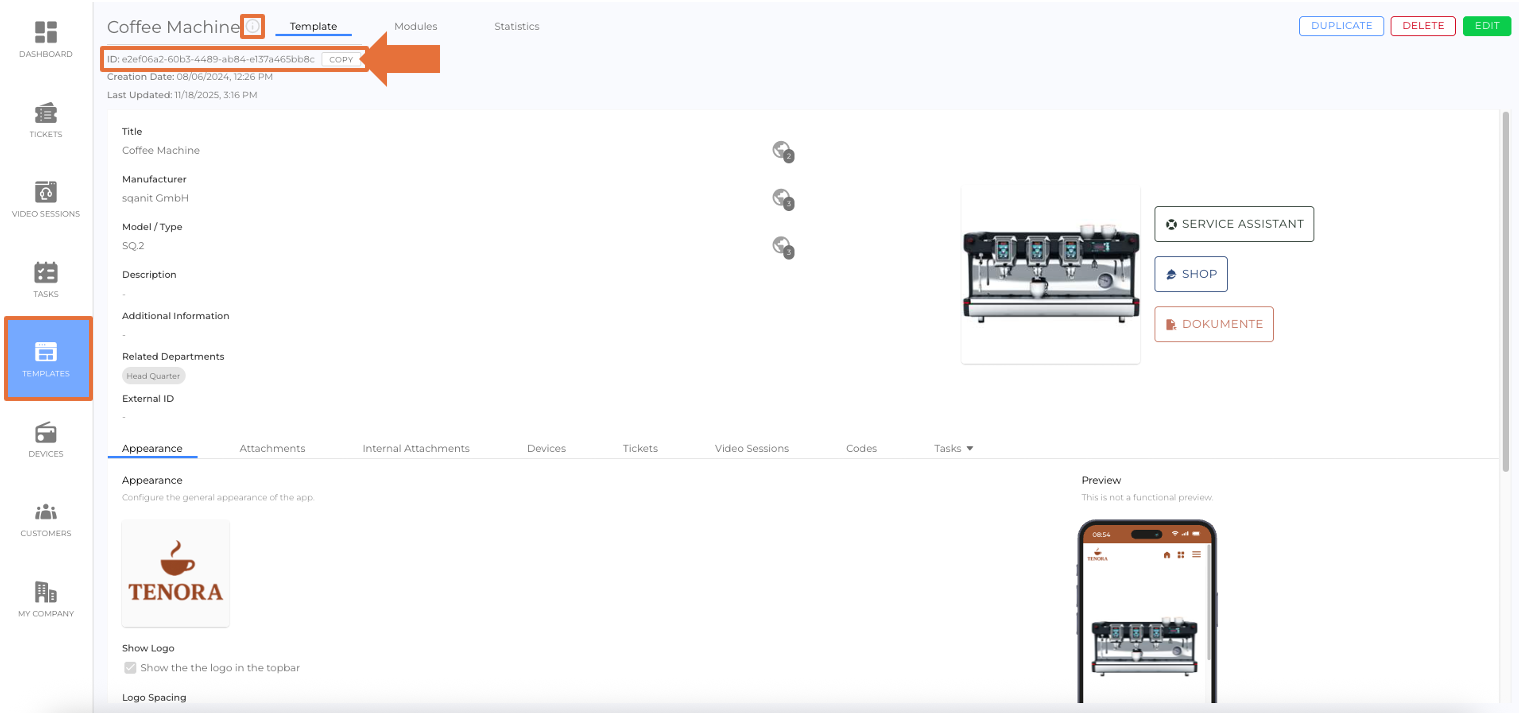
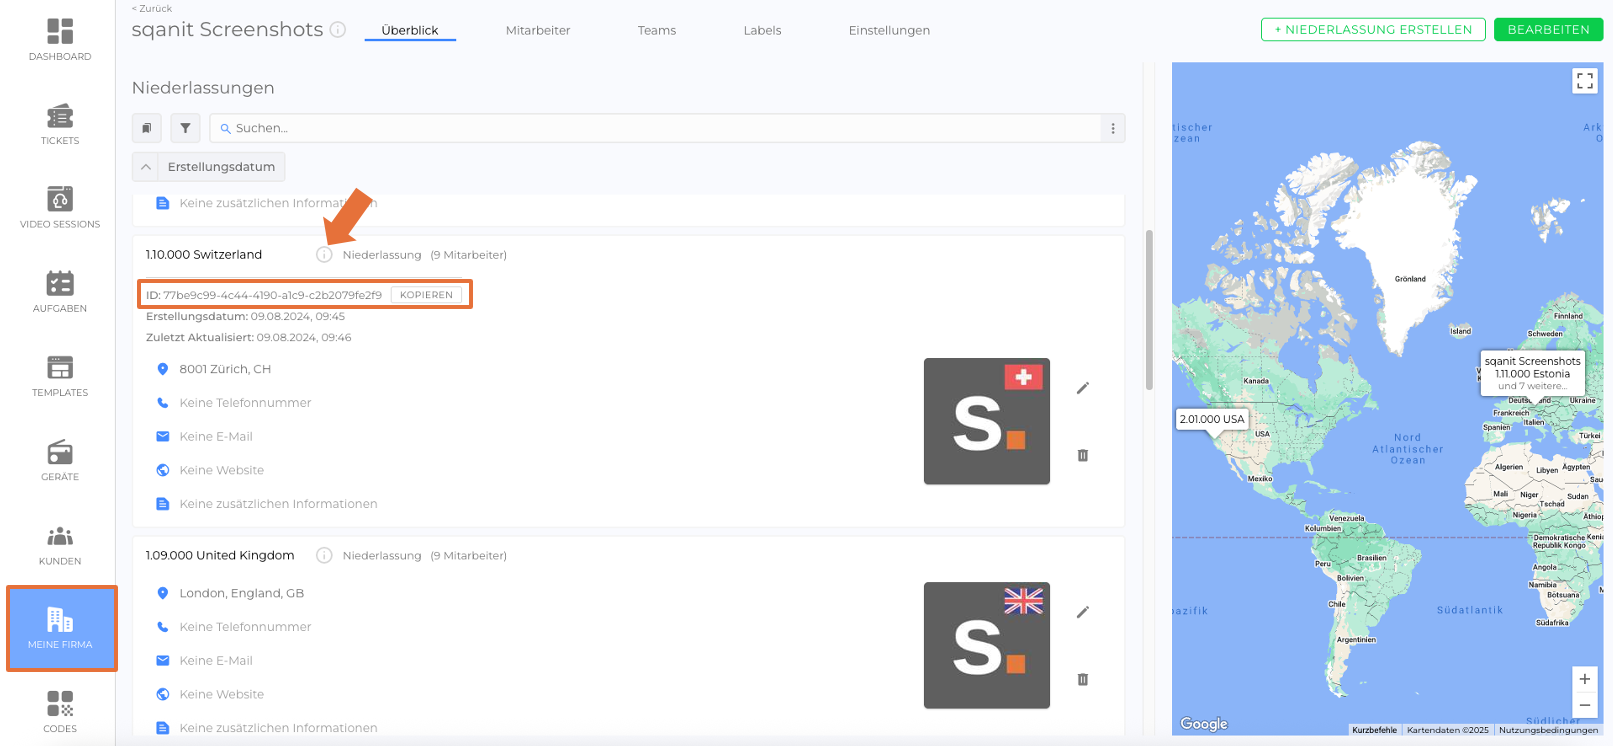
| id Identifying field for updates | ID of the template (picture) xxxxxxxx-xxxx-xxxx-xxxx-xxxxxxxxxxxx (32 digits) | ID |
| title.XX Required for creation | Microwave | Title |
| manufacturer.XX | Generic Inc. | Manufacturer |
| model.XX | MW 3000 | Model / Type |
| description.XX | For defrosting and heating food | Description |
| additionalData.XX | Article No.: 11223344 | Additional Information |
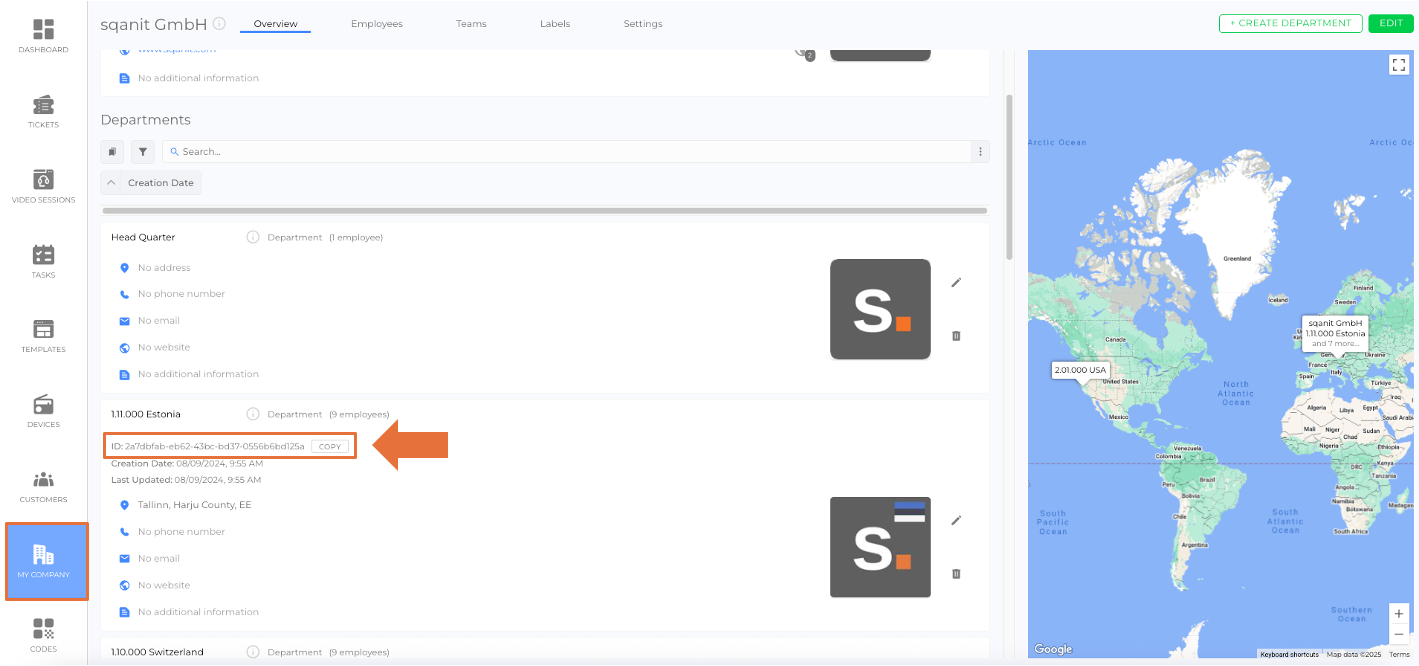
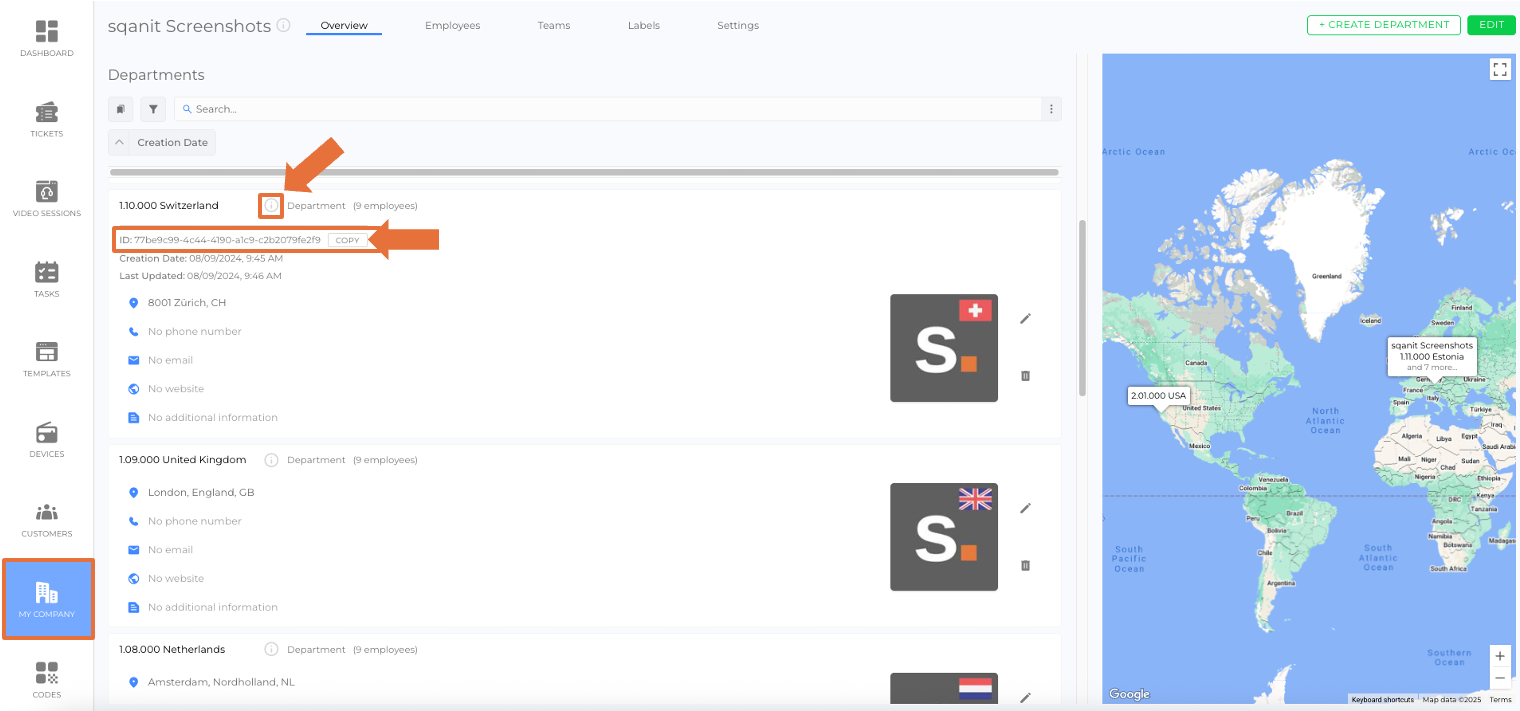
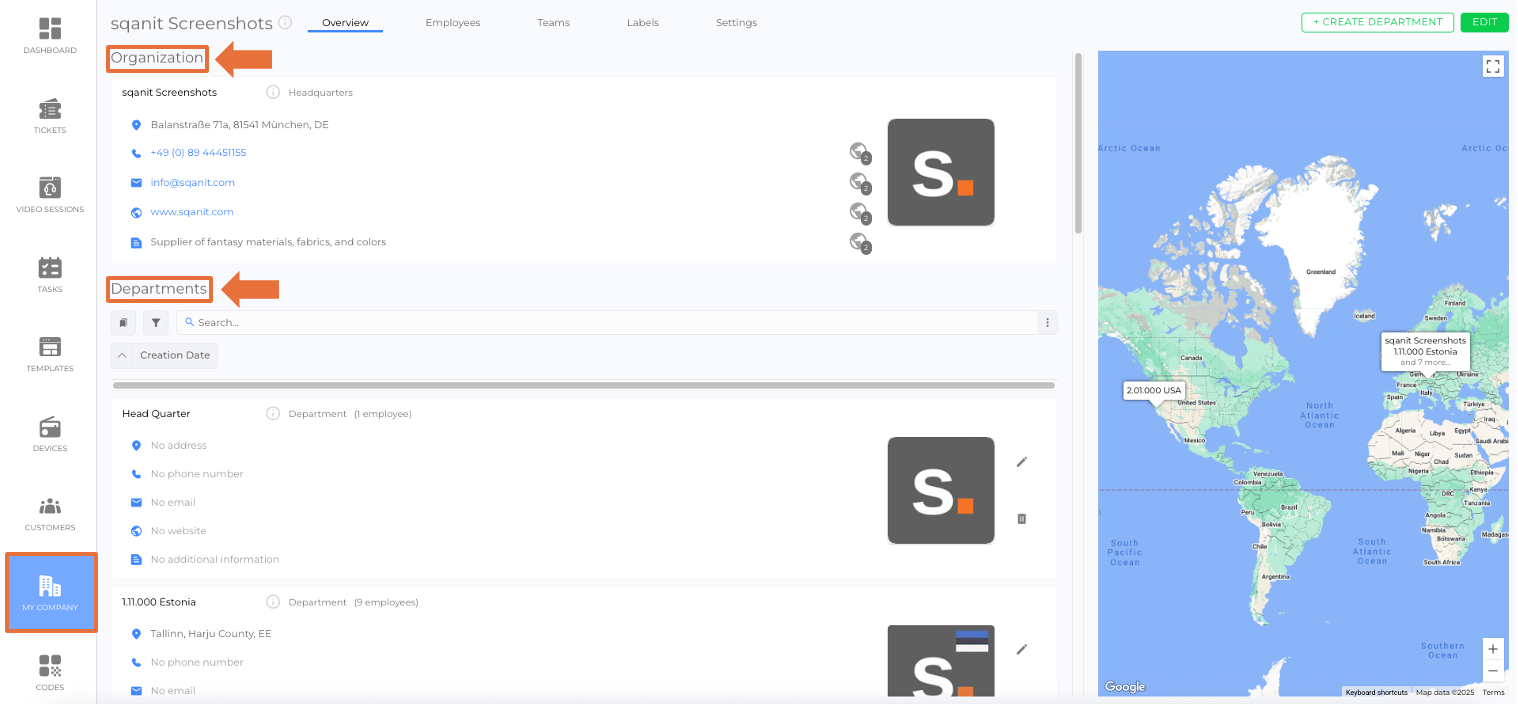
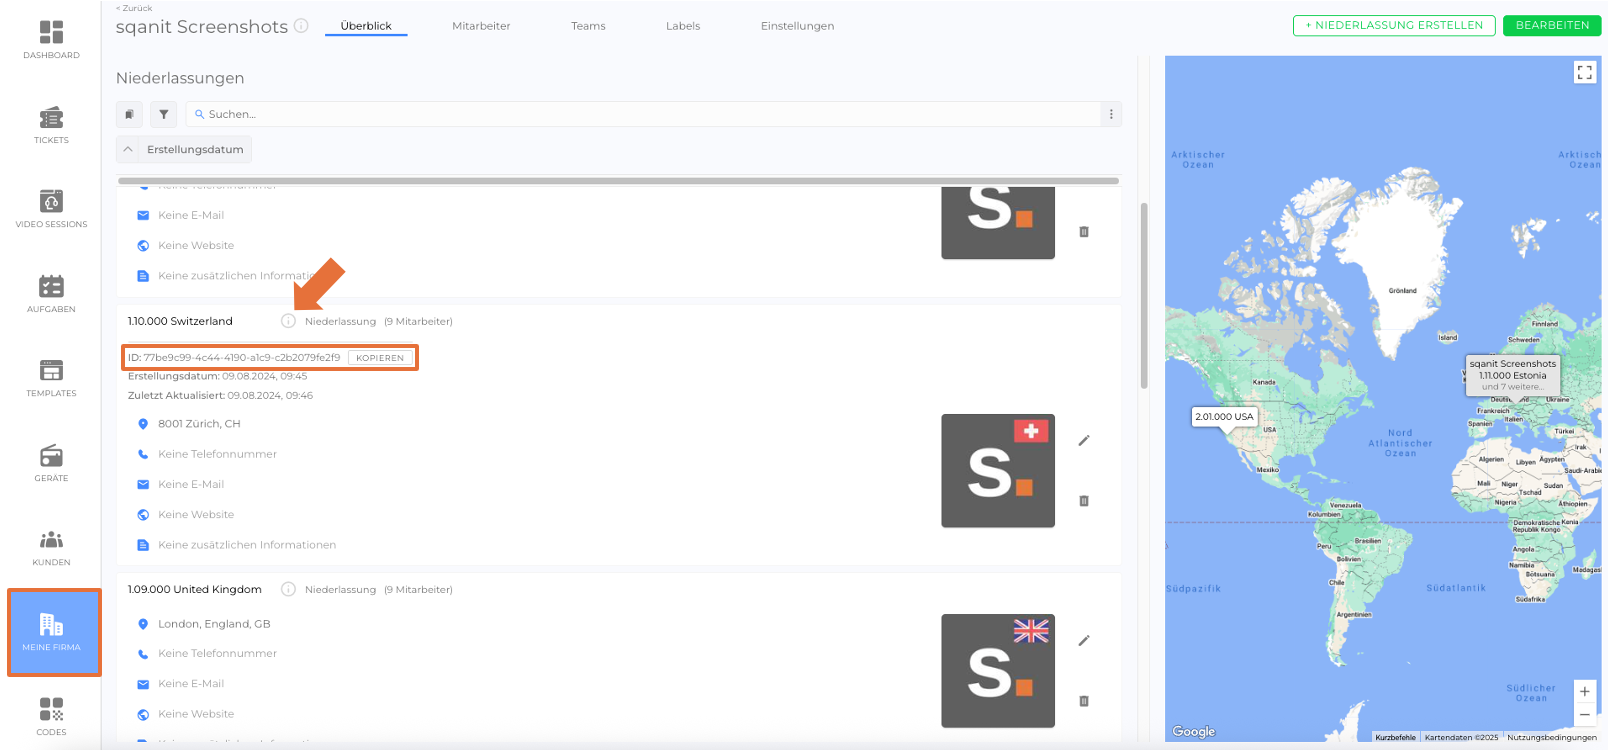
| relatedDepartments.X (X = 0 - ∞) 0 = 1st department 1 = 2nd department etc. | ID of an existing department (picture) xxxxxxxx-xxxx-xxxx-xxxx-xxxxxxxxxxxx (32 digits) | Related Departments |
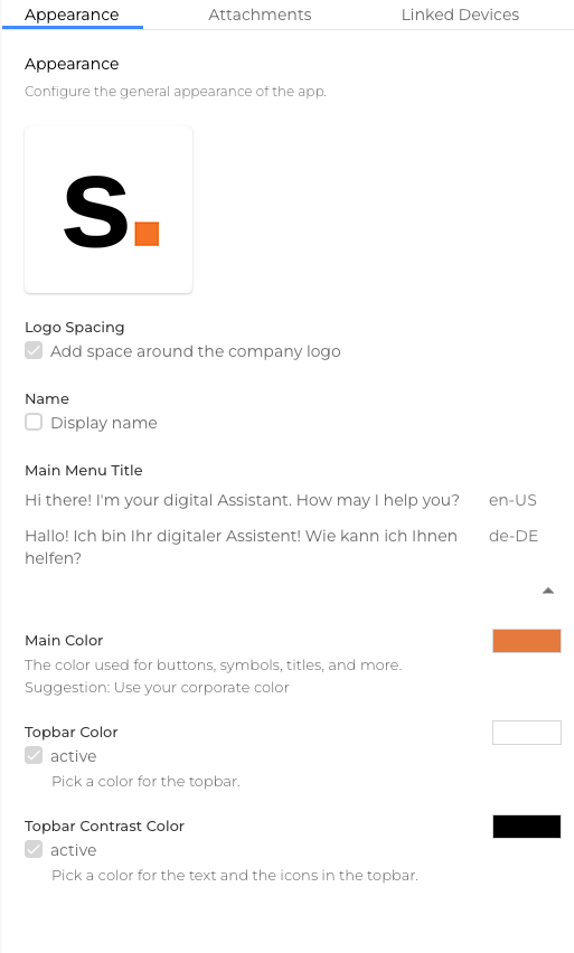
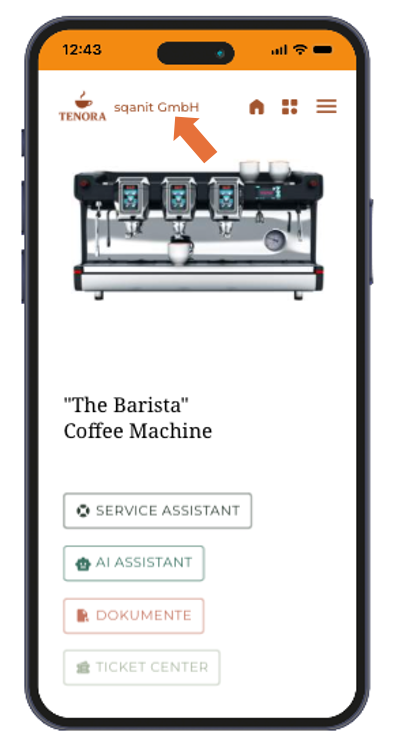
| serviceProviderName.XX | Sample Inc. | Text next to the logo (picture) |
| useServiceProviderName | FALSE (Note: TRUE = Show; FALSE = Hide) | Show / Hide the text next to the logo |
| useServiceProviderLogoSpacing | TRUE (Note: TRUE = add space; FALSE = no extra space) | Logo Spacing Add extra space around the logo |
| serviceProviderColor | #e47a3d HEX color code Note: Must be 3, 6, or 8 digits long and contain only digits and the letters a–f. | Main Color |
| useServiceProviderTopBarBackgroundColor | TRUE (Note: TRUE = on; FALSE = off) | Use Topbar Color |
| serviceProviderTopBarBackgroundColor | #ffffff HEX color code Note: Must be 3, 6, or 8 digits long and contain only digits and the letters a–f. | Topbar Color |
| useServiceProviderTopBarControlsColor | TRUE (Note: TRUE = on; FALSE = off) | Use Topbar Contrast Color |
| serviceProviderTopBarControlsColor | #000000 HEX color code Note: Must be 3, 6, or 8 digits long and contain only digits and the letters a–f. | Topbar Contrast Color |
| serviceProviderWelcomeText.XX | Hi there! I'm your digital Assistant. How may I help you? | Main Menu Title |
| serviceProviderWelcomeTitle.XX | --- | Currently not available |
Note: XX = Insert a language tag in BCP47 format
1. Use the filters to reduce the list of templates to those you want to update
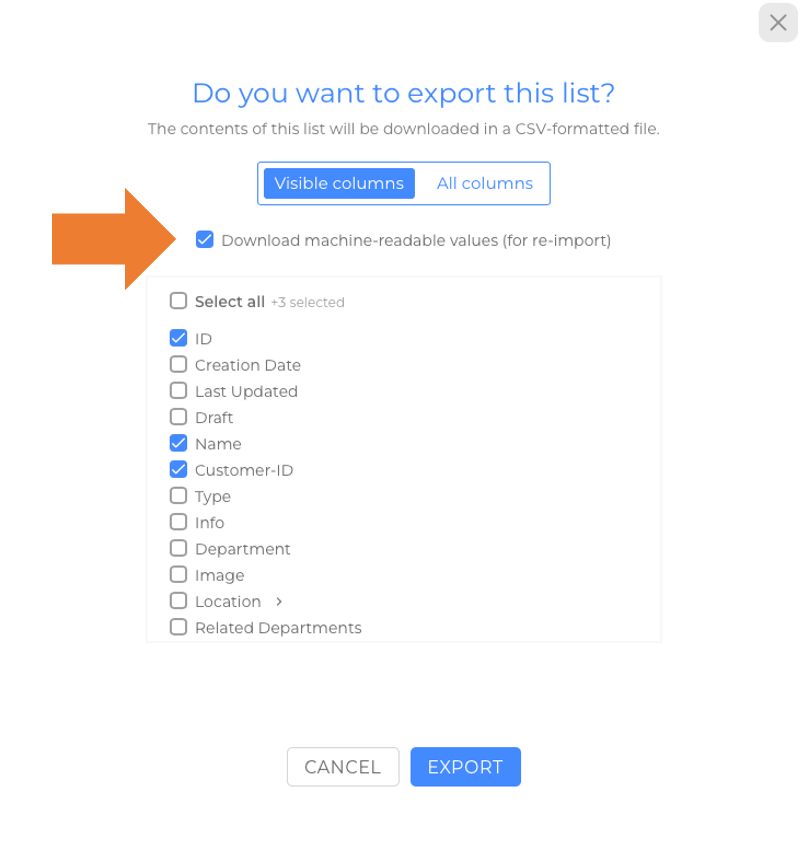
2. Export the list (select only the columns you need and export the list in machine-readable format) (picture)
Note: "id" is required as identifying field
3. Edit the exported CSV file and enter your changes
4. Import the CSV file
Devices
Sample file download:
Example (EN+DE):
Input Data in Excel (picture)(picture)
Result after Import (picture)
| Column Title | Input Data Example | Corresponding Input Field |
|---|---|---|
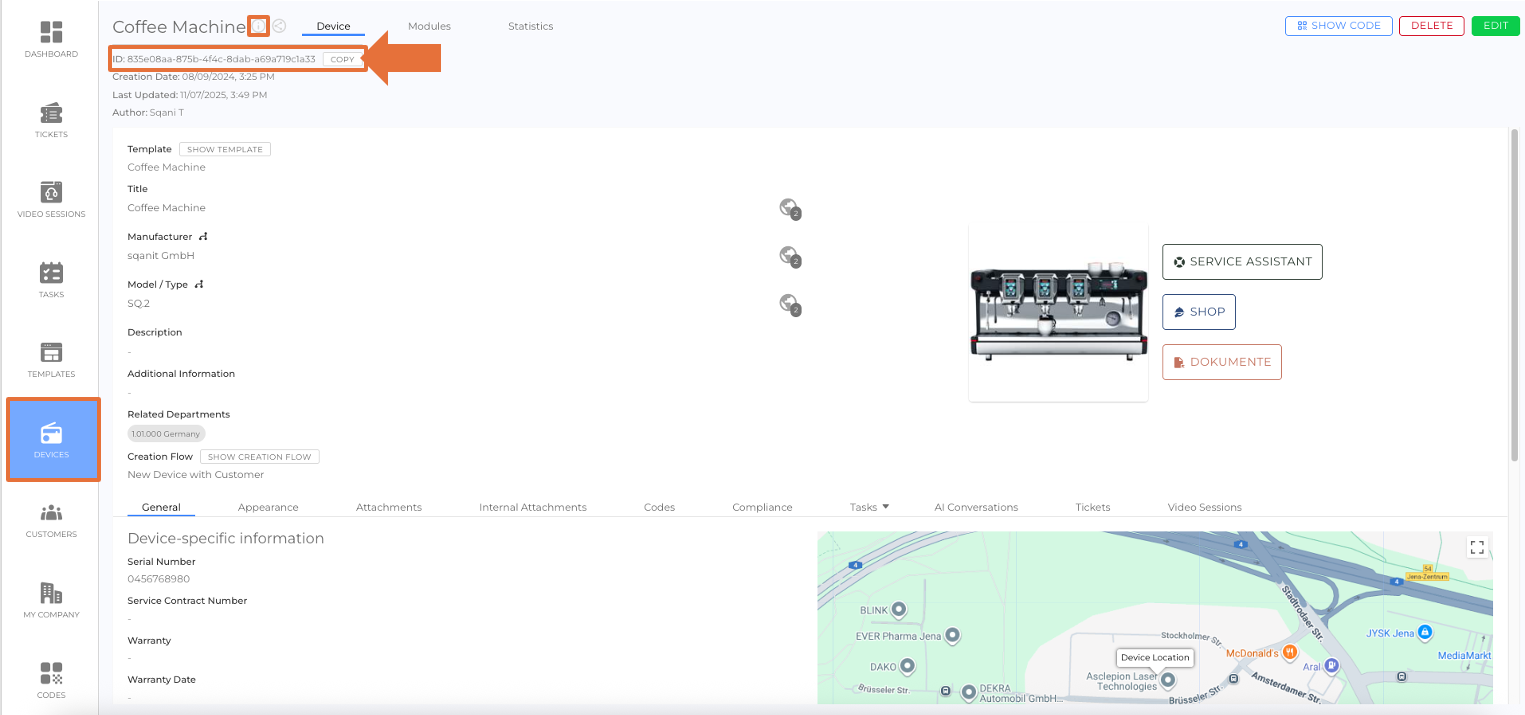
| id Identifying field for updates | ID of the device (picture) xxxxxxxx-xxxx-xxxx-xxxx-xxxxxxxxxxxx (32 digits) | ID |
| template Required for creation | ID of an existing template (picture) xxxxxxxx-xxxx-xxxx-xxxx-xxxxxxxxxxxx (32 digits) 868fddc9-6318-4e5d-a825-33d364f204bd | Template |
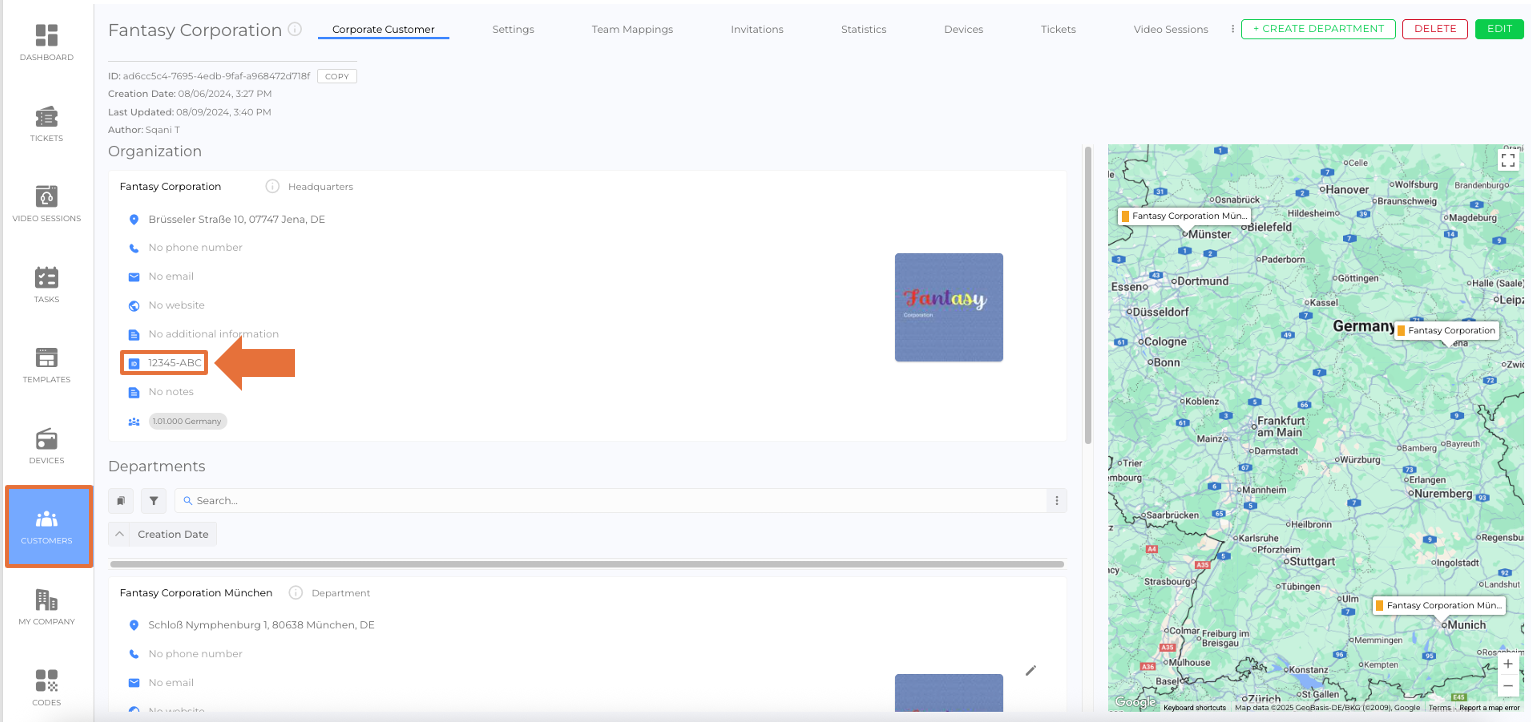
| customer | ID of an existing customer (picture) xxxxxxxx-xxxx-xxxx-xxxx-xxxxxxxxxxxx (32 digits) 7f89fa2e-1c40-4951-aed1-332e444344ce or Customer-ID of an existing customer (picture) 12345-XYZ | Customer |
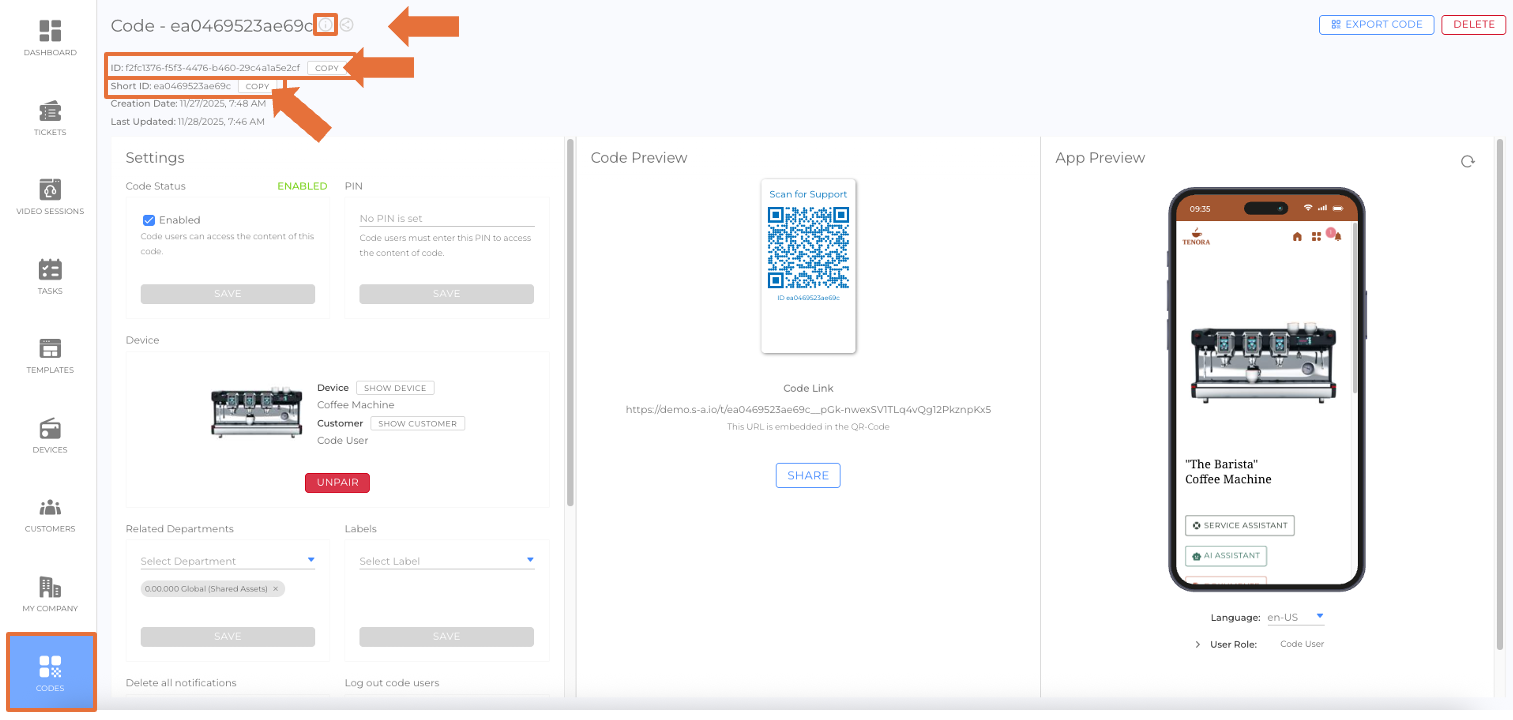
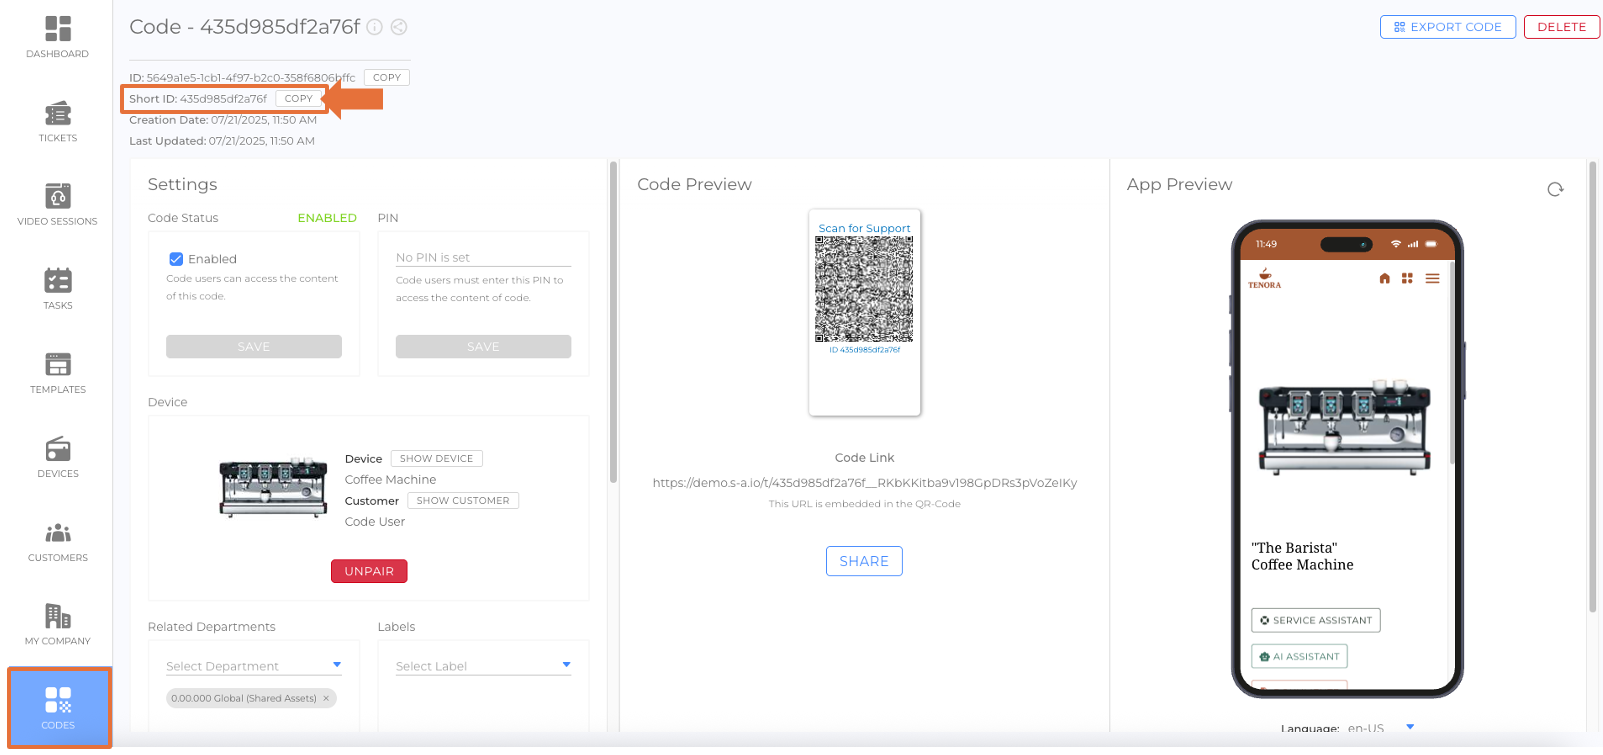
| objectTag Identifying field for updates | ID of an existing unpaired code (picture) xxxxxxxx-xxxx-xxxx-xxxx-xxxxxxxxxxxx (32 digits) 59114cb5-15f7-4099-b0fd-95a9ee30e47a or Short-ID of an existing unpaired code (picture) xxxxxxxxxxxxxx (14 digits) ca469655ded046 or _createNew to have the system create a new code and pair it with the new device | Code |
| title.XX Note: Enter only if different from the template | Microwave | Title |
| manufacturer.XX Note: Enter only if different from the template | Generic Inc. | Manufacturer |
| model.XX Note: Enter only if different from the template | MW 3000 | Model / Type |
| description.XX Note: Enter only if different from the template | For defrosting and heating food | Description |
| additionalData.XX Note: Enter only if different from the template | Article No.: 11223344 | Additional Information |
| serialNumber Identifying field for updates | 123-SSS-456 | Serial Number |
| serviceContract Identifying field for updates | 123-CCC-456 | Service Contract Number |
| externalId Identifying field for updates | 123-EXT-001 | External ID |
| location.validated | TRUE (Note: TRUE = on; FALSE = off) | Address Validation on/off |
| location.latitude | 48.1186072 | Latitude |
| location.longitude | 11.6010435 | Longitude |
| location.country | DE (ISO-Alpha 2 Country Code) | Country |
| location.state | Bayern | State |
| location.city | München | City |
| location.zipCode | 81541 | ZIP |
| location.street | Balanstraße | Street |
| location.streetNumber | 71a | Street Number |
| location.floor | 5 | Floor |
| location.room | Kitchen 1 | Room |
| relatedDepartments.X (X = 0 - ∞) 0 = 1st department 1 = 2nd department etc. | ID of an existing department (picture) xxxxxxxx-xxxx-xxxx-xxxx-xxxxxxxxxxxx (32 digits) | Related Departments |
| serviceProviderName.XX Note: Enter only if different from the template | Sample Inc. | Text next to the logo (picture) |
| useServiceProviderName Note: Enter only if different from the template | FALSE (Note: TRUE = on; FALSE = off) | Show / Hide the text next to the logo |
| useServiceProviderLogoSpacing Note: Enter only if different from the template | TRUE (Note: TRUE = add space; FALSE = no extra space) | Logo Spacing Add extra space around the logo |
| serviceProviderColor Note: Enter only if different from the template | #e47a3d HEX color code Note: Must be 3, 6, or 8 digits long and contain only digits and the letters a–f. | Main Color |
| useServiceProviderTopBarBackgroundColor Note: Enter only if different from the template | TRUE (Note: TRUE = on; FALSE = off) | Use Topbar Color |
| serviceProviderTopBarBackgroundColor Note: Enter only if different from the template | #ffffff HEX color code Note: Must be 3, 6, or 8 digits long and contain only digits and the letters a–f. | Topbar Color |
| useServiceProviderTopBarControlsColor Note: Enter only if different from the template | TRUE (Note: TRUE = on; FALSE = off) | Use Topbar Contrast Color |
| serviceProviderTopBarControlsColor Note: Enter only if different from the template | #000000 HEX color code Note: Must be 3, 6, or 8 digits long and contain only digits and the letters a–f. | Topbar Contrast Color |
| serviceProviderWelcomeText.XX Note: Enter only if different from the template | Hi there! I'm your digital Assistant. How may I help you? | Main Menu Title |
| serviceProviderWelcomeTitle.XX | --- | Currently not available |
Note: XX = Insert a language tag in BCP47 format
Enter only device-specific data that deviates from the template.
Remember: As long as there are no device-specific entries, input fields will inherit their data from the template. If an input field has a device-specific entry, it will no longer be synchronized with the template.
1. Use the filters to reduce the list of devices to those you want to update
2. Export the list (select only the columns you need and export the list in machine-readable format) (picture)
Note: Use "id", "objectTag", "serialNumber", or "serviceContract" as identifying field
3. Edit the exported CSV file and enter your changes
4. Import the CSV file
Corporate Customers
Sample file download:
Example (EN+DE):
Input Data in Text Editor (picture)
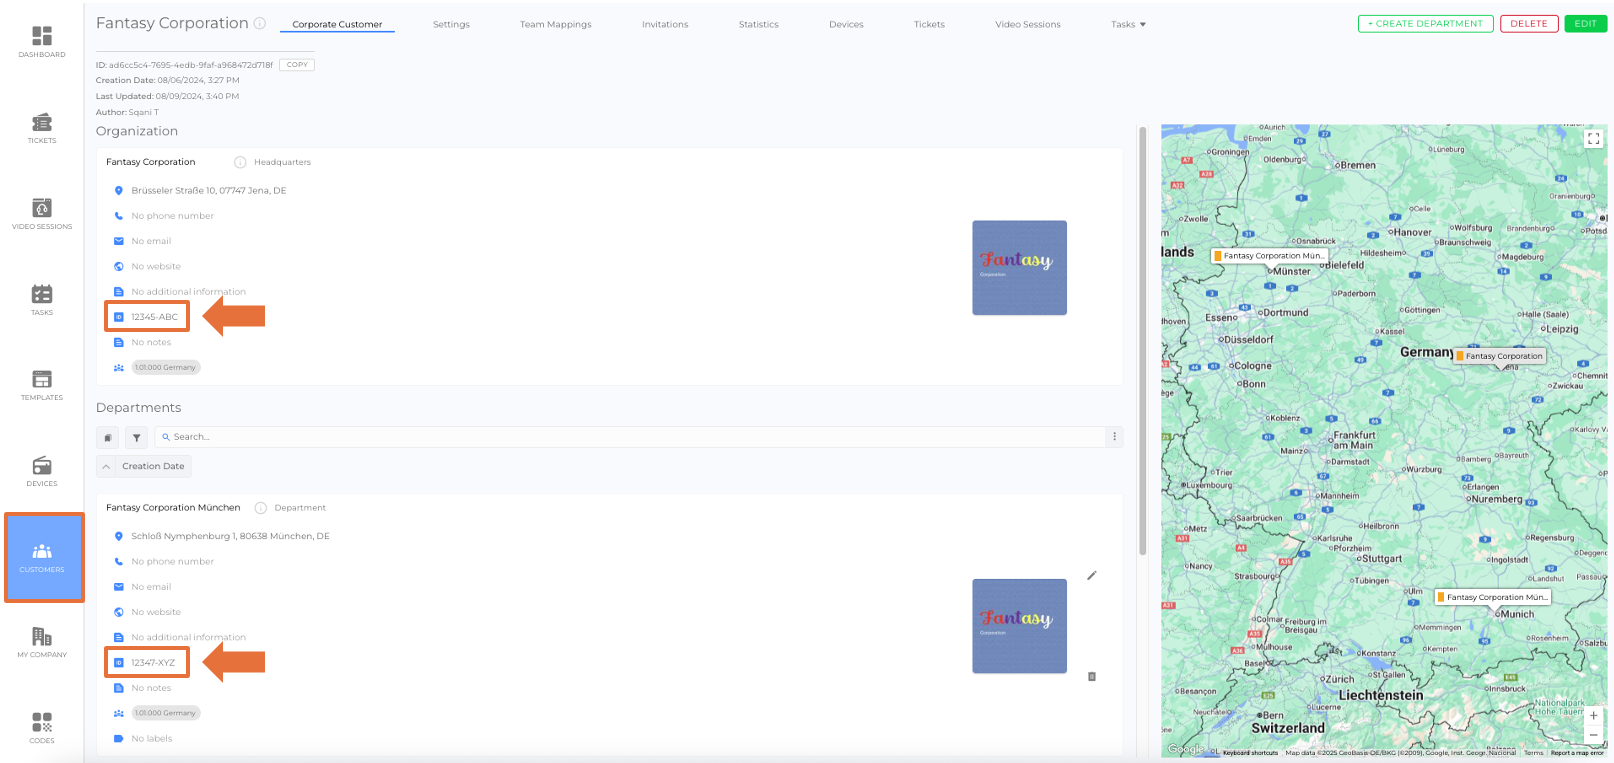
Result after Import (picture)
| Column Title | Input Data Example | Corresponding Input Field |
|---|---|---|
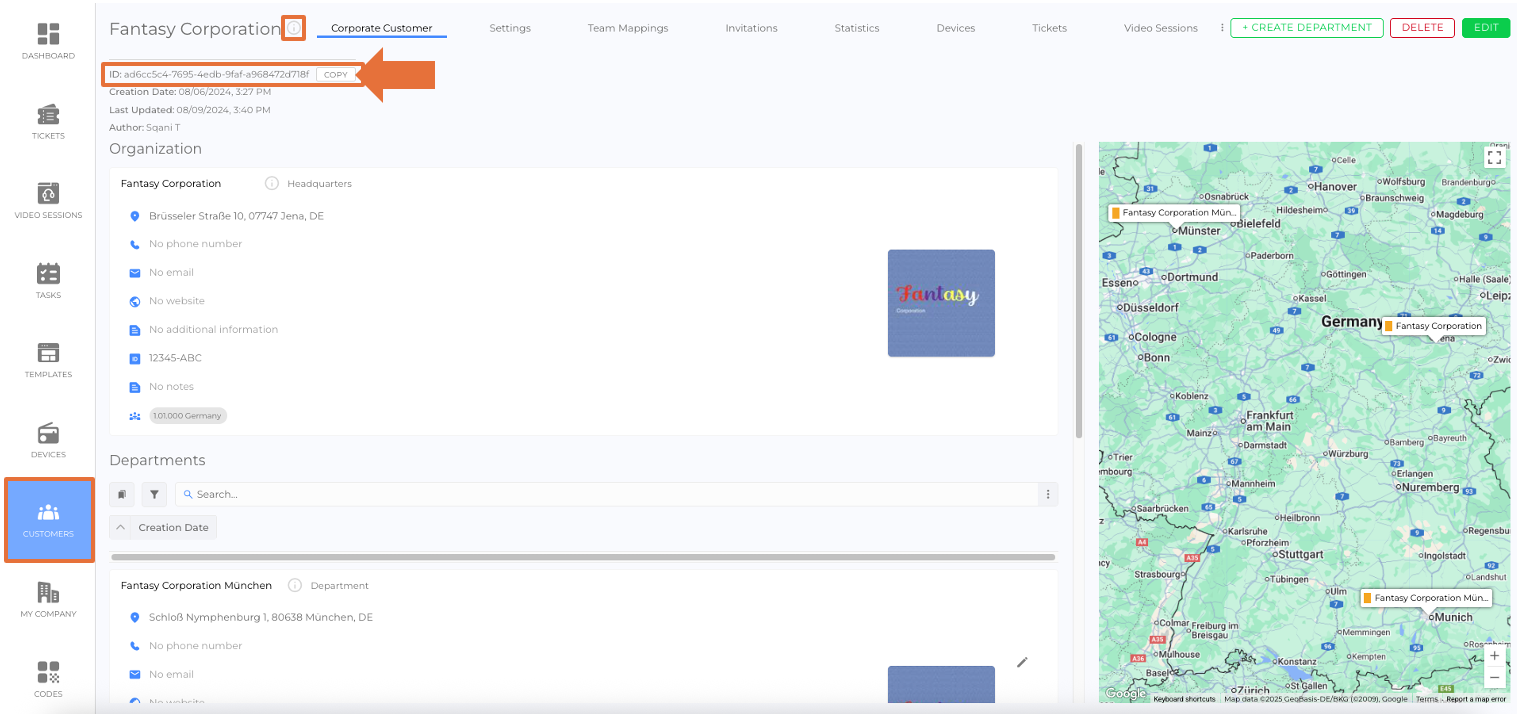
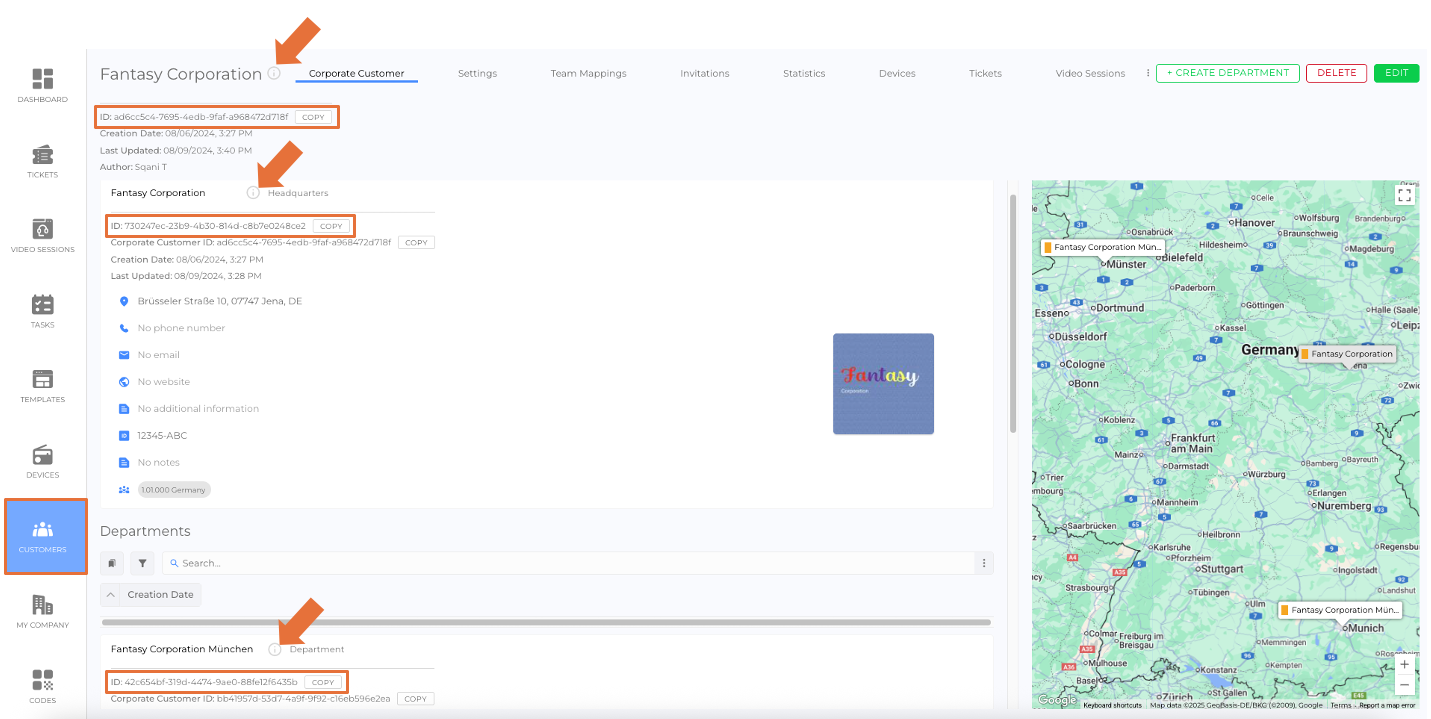
| id Identifying field for updates | ID of the corporate customer (picture) xxxxxxxx-xxxx-xxxx-xxxx-xxxxxxxxxxxx (32 digits) | ID |
| organization.name Required for creation Identifying field for updates | Fantasy Corporation | Name |
| organization.address.validated | TRUE (Note: TRUE = on; FALSE = off) | Address Validation on/off |
| organization.address.street | Marienplatz | Street |
| organization.address.streetNumber | 1 | Street Number |
| organization.address.floor | 5 | Floor |
| organization.address.room | 1c | Room |
| organization.address.zipCode | 80331 | ZIP |
| organization.address.city | München | City |
| organization.address.state | Bayern | State |
| organization.address.country | DE (ISO-Alpha 2 Country Code) | Country |
| organization.address.latitude | 48.1373952 | Latitude |
| organization.address.longitude | 11.5747712 | Longitude |
| organization.phone.XX | +4989 4445155 | Phone Number |
| organization.email.XX | info@fantasy-corporation.com | Email Address |
| organization.website.XX | https://fantasy-corporation.com | Website |
| organization.info.XX | "Supplier of fantasy materials, fabrics and colors." | Additional Information |
| customerId Identifying field for updates | 12345-XYZ | Customer-ID |
| info.XX | Contact person: Mrs. Fantasy (CEO) | Notes |
| relatedDepartments.X (X = 0 - ∞) 0 = 1st department 1 = 2nd department etc. | ID of an existing department (picture) xxxxxxxx-xxxx-xxxx-xxxx-xxxxxxxxxxxx (32 digits) | Related Departments |
| labels.XX | Example Label Name | Label-ID |
Note: XX = Insert a language tag in BCP47 format
1. Use the filters to reduce the list of customers to those you want to update
Important: Filter out private customers. You cannot update corporate and private customers at once.
2. Export the list (select only the columns you need and export the list in machine-readable format) (picture)
Note: Use "id", "organization.name", or "customerId" as identifying field
3. Edit the exported CSV file and enter your changes
4. Import the CSV file
Corporate Customers (with Departments)
In order for the system to recognize the connection between the headquarters and departments, the “customerId” of the headquarters must be entered in the “mainCustomer” field of its departments.

Sample file download:
Example (EN+DE):
Input Data in Excel (picture)
Input Data in Text Editor (picture)
Result after Import (picture)
| Column Title | Input Data Example | Corresponding Input Field |
|---|---|---|
| id Identifying field for updates | ID of the corporate customer (picture) xxxxxxxx-xxxx-xxxx-xxxx-xxxxxxxxxxxx (32 digits) | ID |
| organization.name Required for creation Identifying field for updates | Fantasy Corporation | Name |
| customerId Required for creation (Headquarters) Identifying field for updates | 12345-XYZ | Customer-ID |
| mainCustomer Required for each Department for creation | 12345-XYZ | Customer-ID of the Headquarters |
| … | … | … |
| department.name Required for creation | Department 1 | Name |
| department.address.validated | TRUE (Note: TRUE = on; FALSE = off) | Address Validation on/off |
| department.address.street | Schloß Nymphenburg | Street |
| department.address.streetNumber | 1 | Street Number |
| department.address.floor | 1 | Floor |
| department.address.room | 3 | Room |
| department.address.zipCode | 80638 | ZIP |
| department.address.city | München | City |
| department.address.state | Bayern | State |
| department.address.country | DE (ISO-Alpha 2 Country Code) | Country |
| department.address.latitude | 48.15827 | Latitude |
| department.address.longitude | 11.50337 | Longitude |
| department.phone.XX | +4989 4445155 | Phone Number |
| department.email.XX | info@fantasy-department1.com | Email Address |
| department.website.XX | https://fantasy-corporation.com | Website |
| department.info.XX | "Department 1 of Fantasy Corporation" | Additional Information |
| info.XX | Contact person: Mr. Experience (Department Manager) | Notes |
| relatedDepartments.X (X = 0 - ∞) 0 = 1st department 1 = 2nd department etc. | ID of an existing department (picture) xxxxxxxx-xxxx-xxxx-xxxx-xxxxxxxxxxxx (32 digits) | Related Departments |
Note: XX = Insert a language tag in BCP47 format
1. Use the filters to reduce the list of customers to those you want to update
Important: Filter out private customers. You cannot update corporate and private customers at once.
2. Export the list (select only the columns you need and export the list in machine-readable format) (picture)
Note: Use "id", "organization.name", or "customerId" as identifying field
3. Edit the exported CSV file and enter your changes
4. Import the CSV file
Private Customers
Sample file download:
Example (EN+DE):
Input Data in Text Editor (picture)
Result after Import (picture)
| Column Title | Input Data Example | Corresponding Input Field |
|---|---|---|
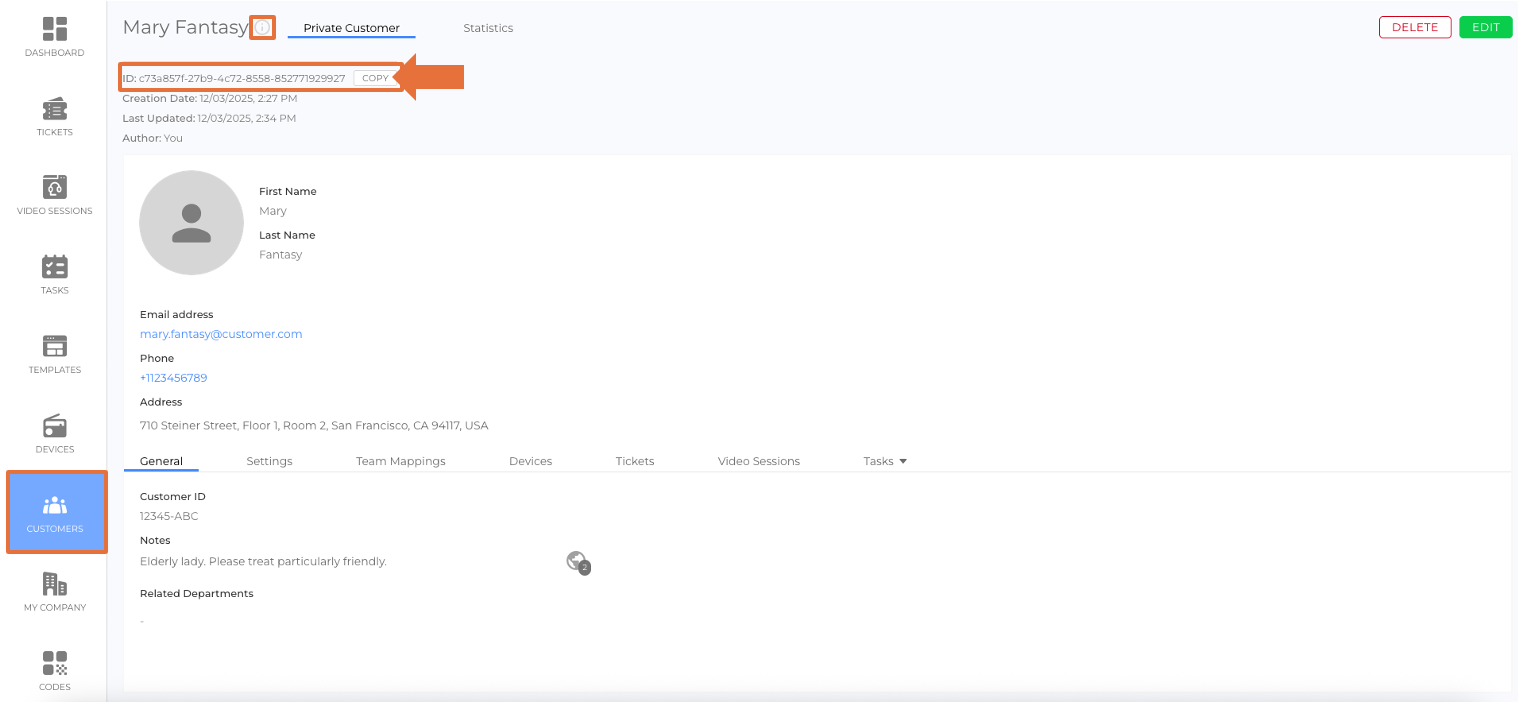
| id Identifying field for updates | ID of the private customer (picture) xxxxxxxx-xxxx-xxxx-xxxx-xxxxxxxxxxxx (32 digits) | ID |
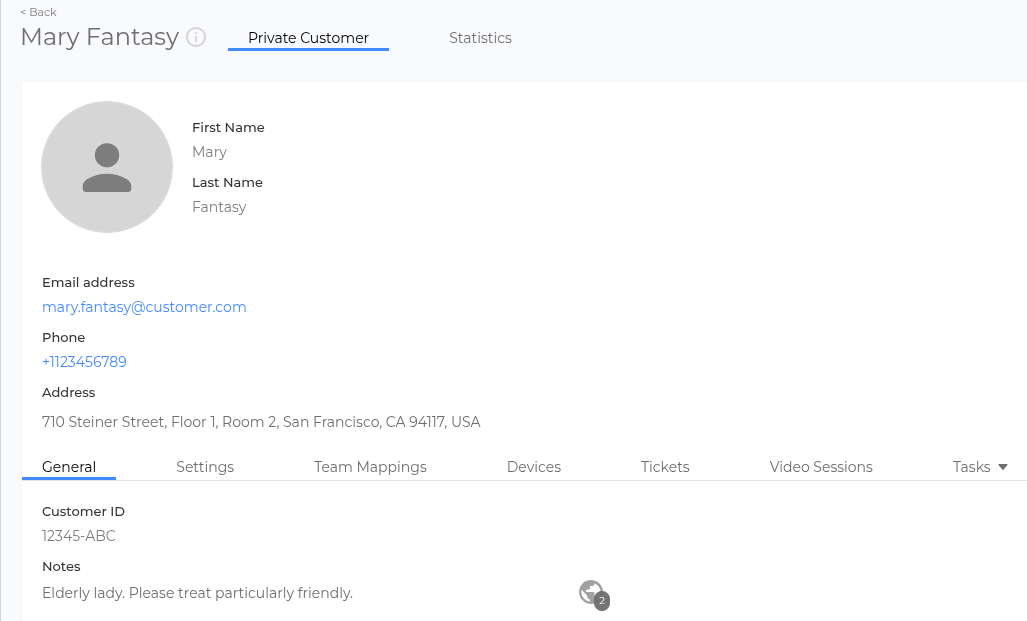
| user.firstName Required for creation Identifying field for updates | Mary | First Name |
| user.lastName Required for creation Identifying field for updates | Fantasy | Last Name |
| mary.fantasy@customer.com | Email Address | |
| user.phone | +1 234 45679 | Phone Number |
| user.address.validated | TRUE (Note: TRUE = on; FALSE = off) | Address Validation on/off |
| user.address.street | Steiner Street | Street |
| user.address.streetNumber | 710 | Street Number |
| user.address.floor | 1 | Floor |
| user.address.room | 2 | Room |
| user.address.zipCode | 94177 | ZIP |
| user.address.city | San Francisco | City |
| user.address.state | California | State |
| user.address.country | US (ISO-Alpha 2 Country Code) | Country |
| user.address.latitude | 37.7760676 | Latitude |
| user.address.longitude | -122.4327231 | Longitude |
| customerId Identifying field for updates | 12345-ABC | Customer-ID |
| info.XX | Elderly lady. Please treat particularly friendly. | Notes |
| relatedDepartments.X (X = 0 - ∞) 0 = 1st department 1 = 2nd department etc. | ID of an existing department (picture) xxxxxxxx-xxxx-xxxx-xxxx-xxxxxxxxxxxx (32 digits) | Related Departments |
Note: XX = Insert a language tag in BCP47 format
1. Use the filters to reduce the list of customers to those you want to update
Important: Filter out corporate customers. You cannot update corporate and private customers at once.
2. Export the list (select only the columns you need and export the list in machine-readable format) (picture)
Note: Use "id", "user.firstName"+"user.lastName", or "customerId" as identifying field
3. Edit the exported CSV file and enter your changes
4. Import the CSV file
Customer Team Mappings
Sample file download:
Example (EN):
Input Data in Excel (picture)
Result after Import (picture)
| Column Title | Input Data Example | Corresponding Input Field |
|---|---|---|
| id Identifying field for updates | ID of the customer team mapping xxxxxxxx-xxxx-xxxx-xxxx-xxxxxxxxxxxx (32 digits) | ID |
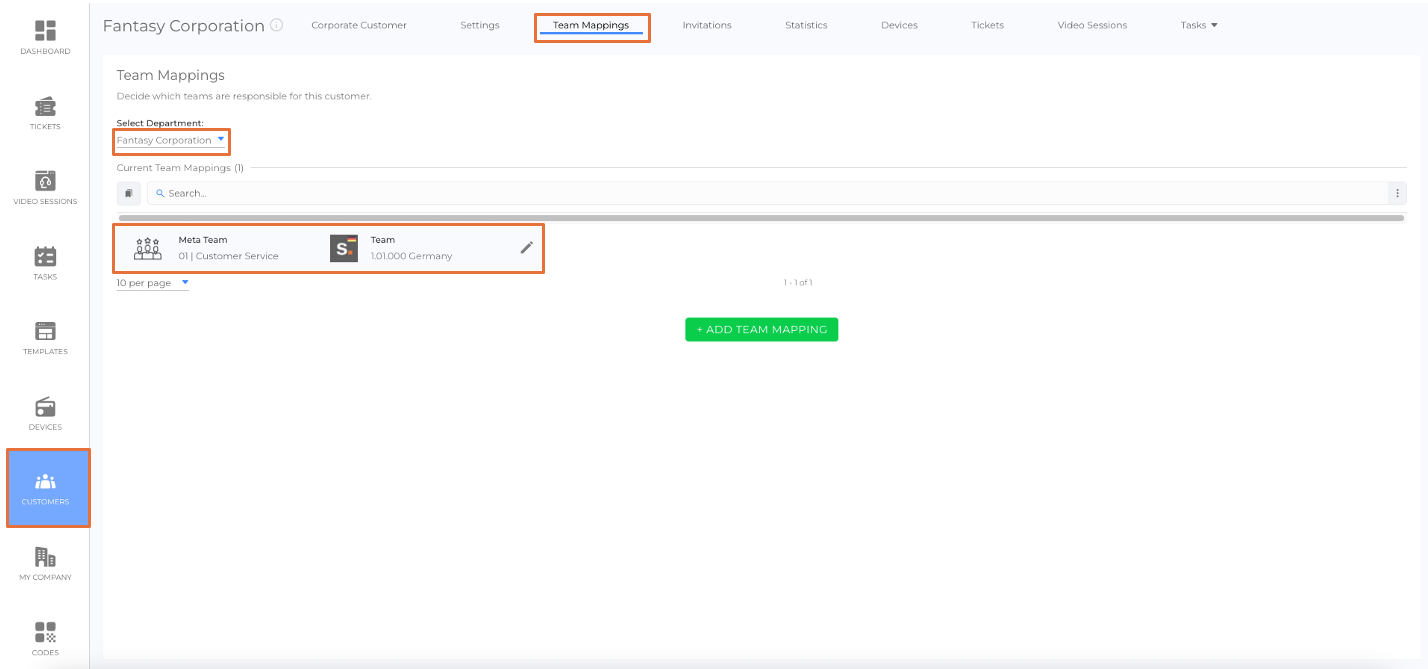
| customer Required for creation | ID of an existing customer (picture) xxxxxxxx-xxxx-xxxx-xxxx-xxxxxxxxxxxx (32 digits) or Customer ID of an existing customer (picture) Note: Has to be unique! | Customer |
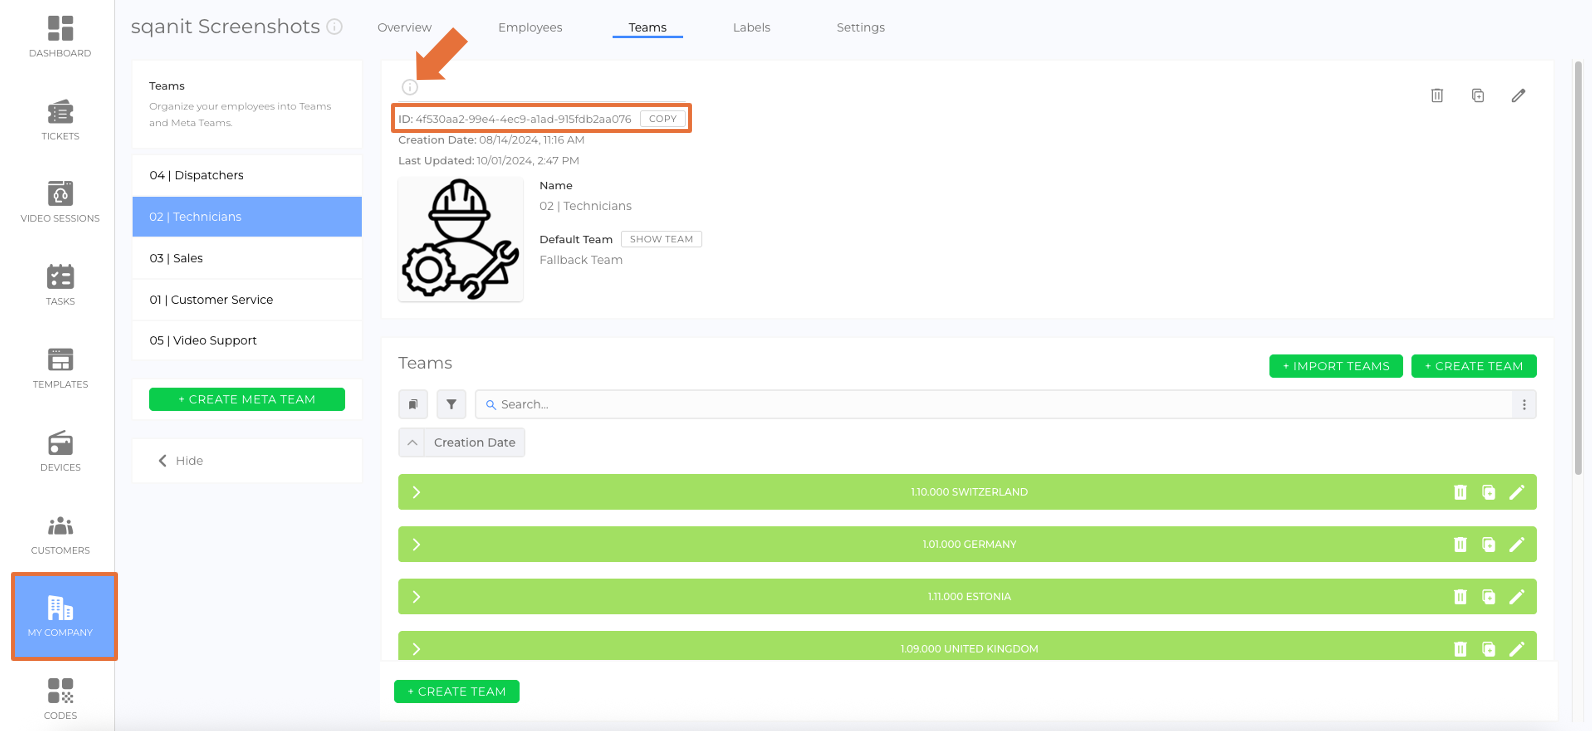
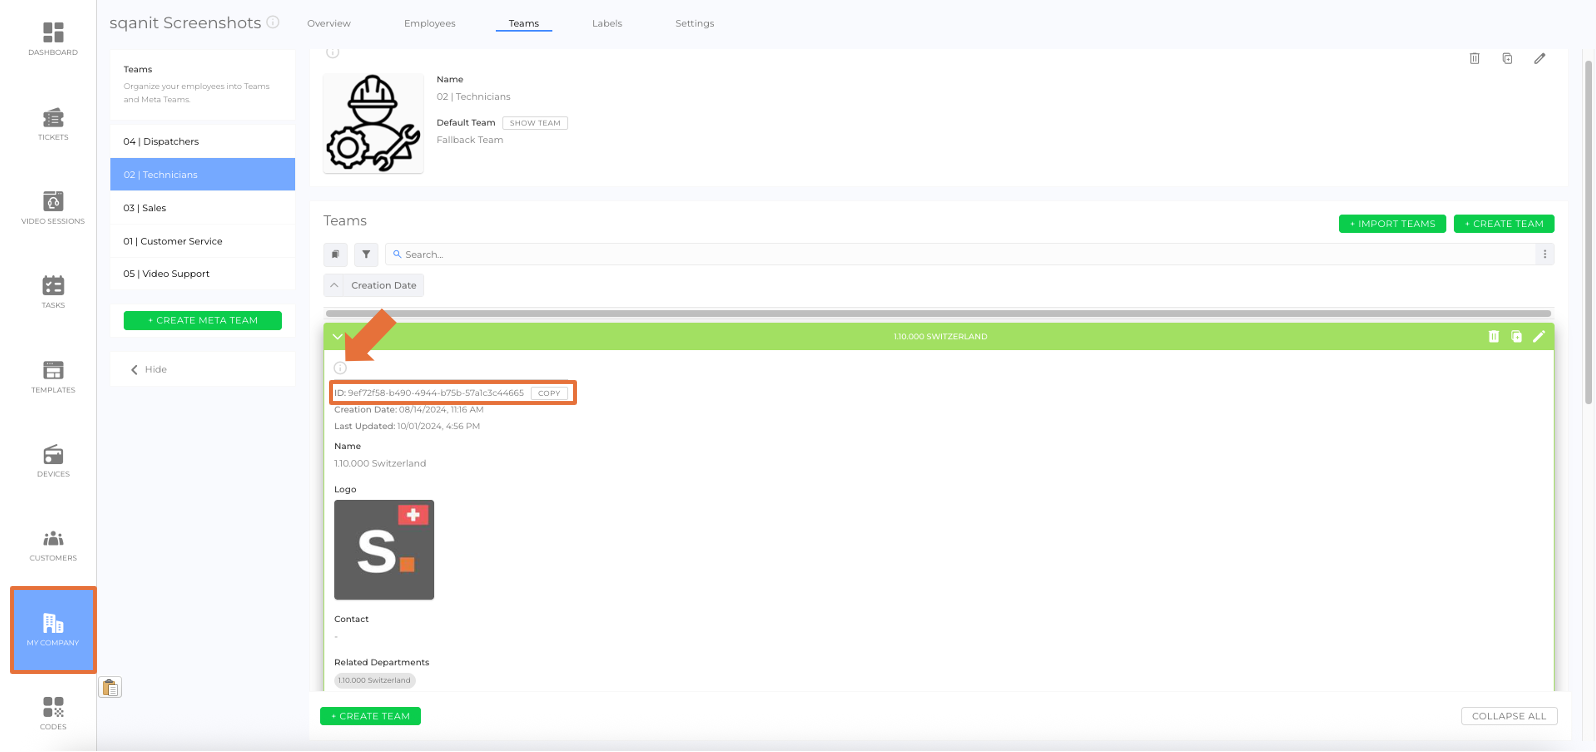
| metaTeam Required for creation | ID of an existing meta team (picture) xxxxxxxx-xxxx-xxxx-xxxx-xxxxxxxxxxxx (32 digits) | Meta Team |
| team Required for creation | ID of an existing team (picture) xxxxxxxx-xxxx-xxxx-xxxx-xxxxxxxxxxxx (32 digits) | Team |
Employees
Sample file download:
Example (EN+DE):
Input Data in Text Editor (picture)
Result after Import (picture)
| Column Title | Input Data Example | Corresponding Input Field |
|---|---|---|
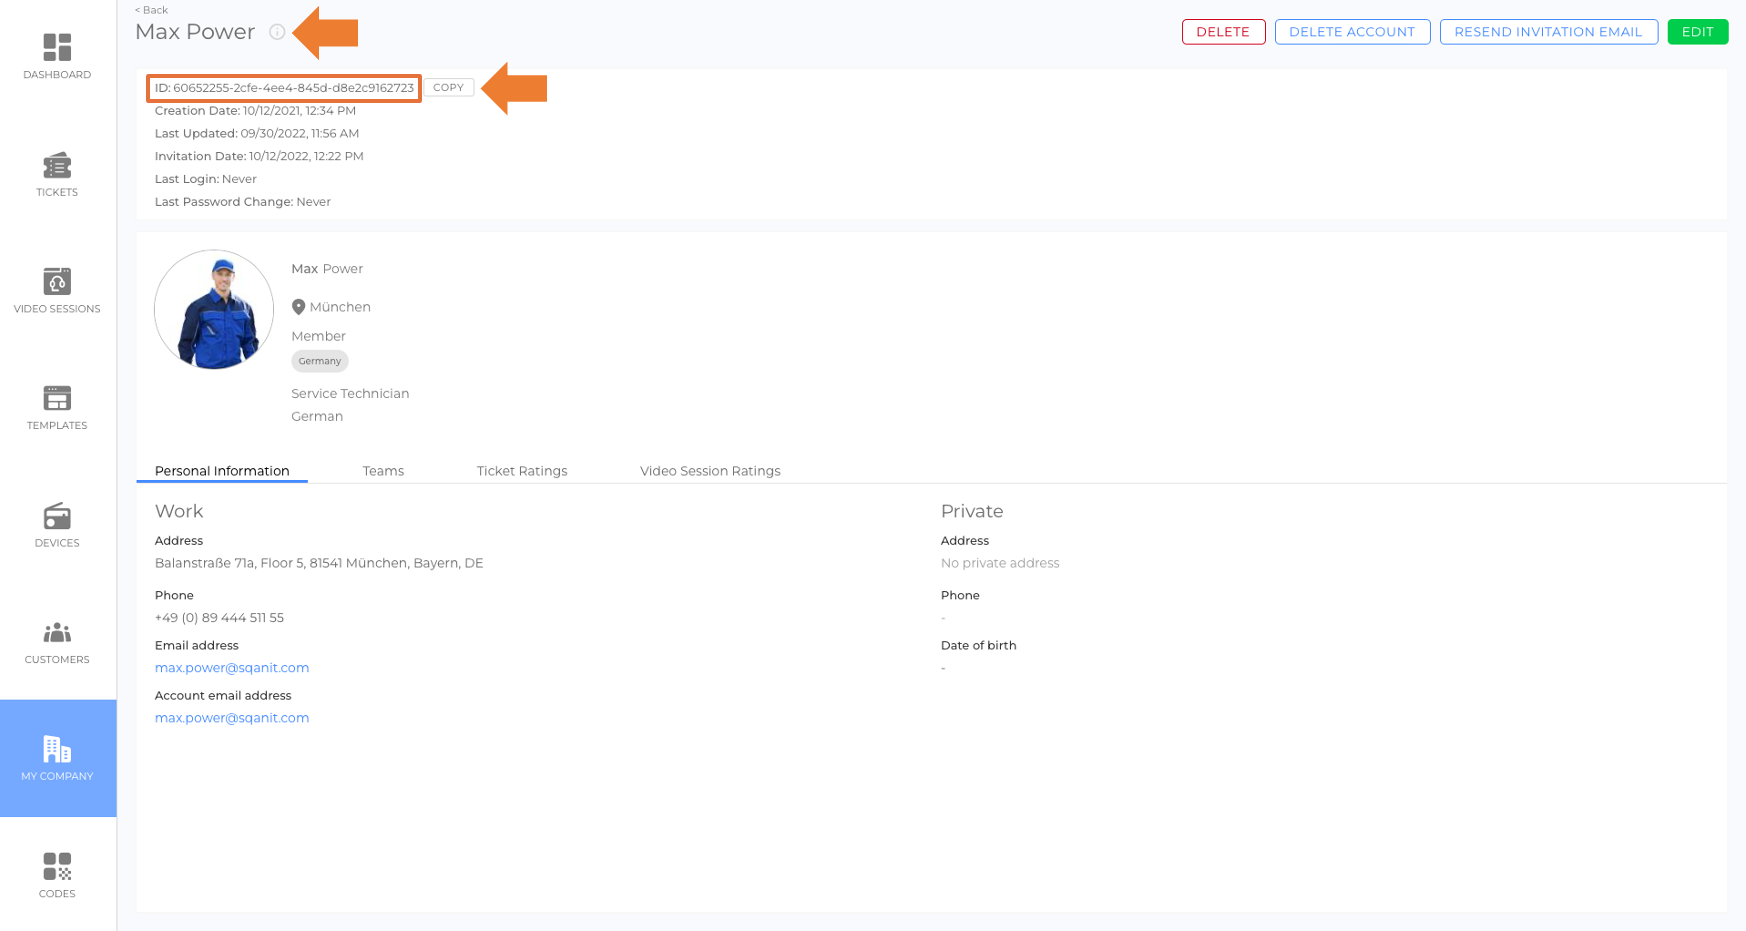
| id Identifying field for updates | ID of the employee (picture) xxxxxxxx-xxxx-xxxx-xxxx-xxxxxxxxxxxx (32 digits) | ID |
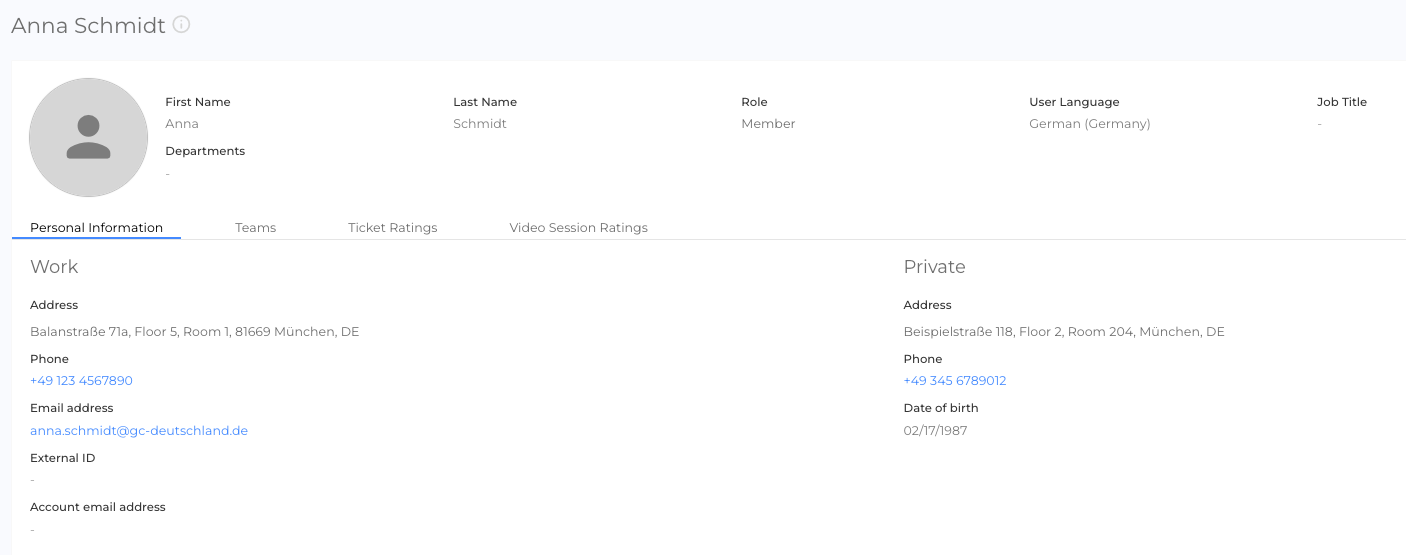
| user.firstName Required for creation | Anna | First Name |
| user.lastName Required for creation | Schmidt | Last Name |
| organizationRole Required for creation | MEMBER (Options: ADMINISTRATOR; DEPARTMENT_ADMINISTRATOR; CONTENT_CREATOR; MODERATOR; MEMBER) | Role |
| user.locale | de-DE (BCP47 format) | Language |
| jobTitle | Service Manager | Job Title |
| departments.X (0 - ∞) 0 = 1st department 1 = 2nd department etc. | ID of an existing department (picture) xxxxxxxx-xxxx-xxxx-xxxx-xxxxxxxxxxxx (32 digits) 8b043724-cae1-4d28-84f9-6d48eed51618 | Department |
| externalId Identifying field for updates | 123-EXT-001 | External ID |
| address.validated | TRUE (Note: TRUE = on; FALSE = off) | Address Validation on/off (Work) |
| address.street | Balanstraße | Street (Work) |
| address.streetNumber | 71a | Street Number (Work) |
| address.floor | 5 | Floor (Work) |
| address.room | 1 | Room (Work) |
| address.state | Bayern | State (Work) |
| address.city | München | City (Work) |
| address.zipCode | 81541 | ZIP (Work) |
| address.country | DE (ISO-Alpha 2 Country Code) | Country (Work) |
| address.latitude | 48.1191091 | Latitude (Work) |
| address.longitude | 11.6009295 | Longitude (Work) |
| phone | +49 123 4567890 | Phone Number (Work) |
| anna.schmidt@gc-deutschland.de | Email Address (Work) | |
| user.address.validated | FALSE (Note: TRUE = on; FALSE = off) | Address Validation on/off (Private) |
| user.address.street | Beispielstraße | Street (Private) |
| user.address.streetNumber | 118 | Street Number (Private) |
| user.address.floor | 2 | Floor (Private) |
| user.address.room | 204 | Room (Private) |
| user.address.zipCode | 81541 | ZIP (Private) |
| user.address.city | München | City (Private) |
| user.address.state | Bayern | State (Private) |
| user.address.country | DE (ISO-Alpha 2 Country Code) | Country (Private) |
| user.address.latitude | 48.1145962 | Latitude (Private) |
| user.address.longitude | 11.6032822 | Longitude (Private) |
| user.phone | +49 345 6789012 | Phone Number (Private) |
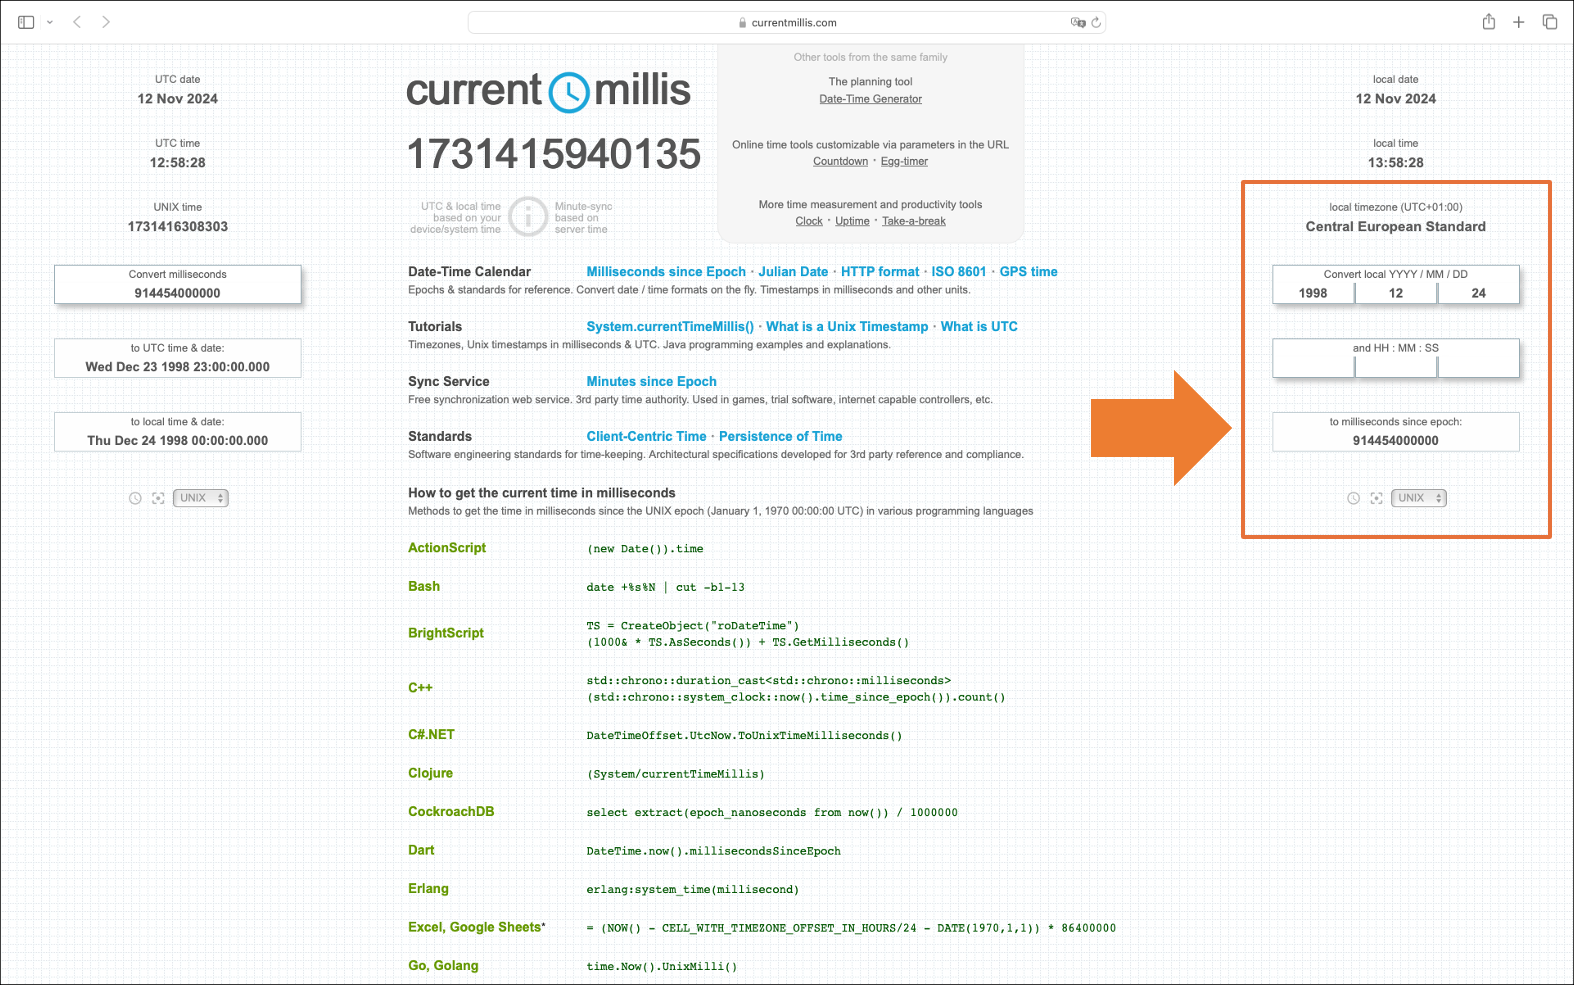
| user.dateOfBirth | 540558000000 UNIX epoch timestamp in milliseconds (picture) Tip: Use a converter (external link) | Date of Birth |
| _invite | TRUE (Note: TRUE = send invitation; FALSE = do not send invitation, ENFORCE = send new invitation to already invited accounts) Note: Already invited accounts won't receive a new invtiation, unless ENFORCE is used. | Invitation |
1. Use the filters to reduce the list of employees to those you want to update
2. Export the list (select only the columns you need and export the list in machine-readable format) (picture)
Note: "id" is required as identifying field
3. Edit the exported CSV file and enter your changes
4. Import the CSV file
Codes
Sample file download:
Example (EN+DE):
Input Data in Excel (picture)
Result after Import (picture)
| Column Title | Input Data Example | Corresponding Input Field |
|---|---|---|
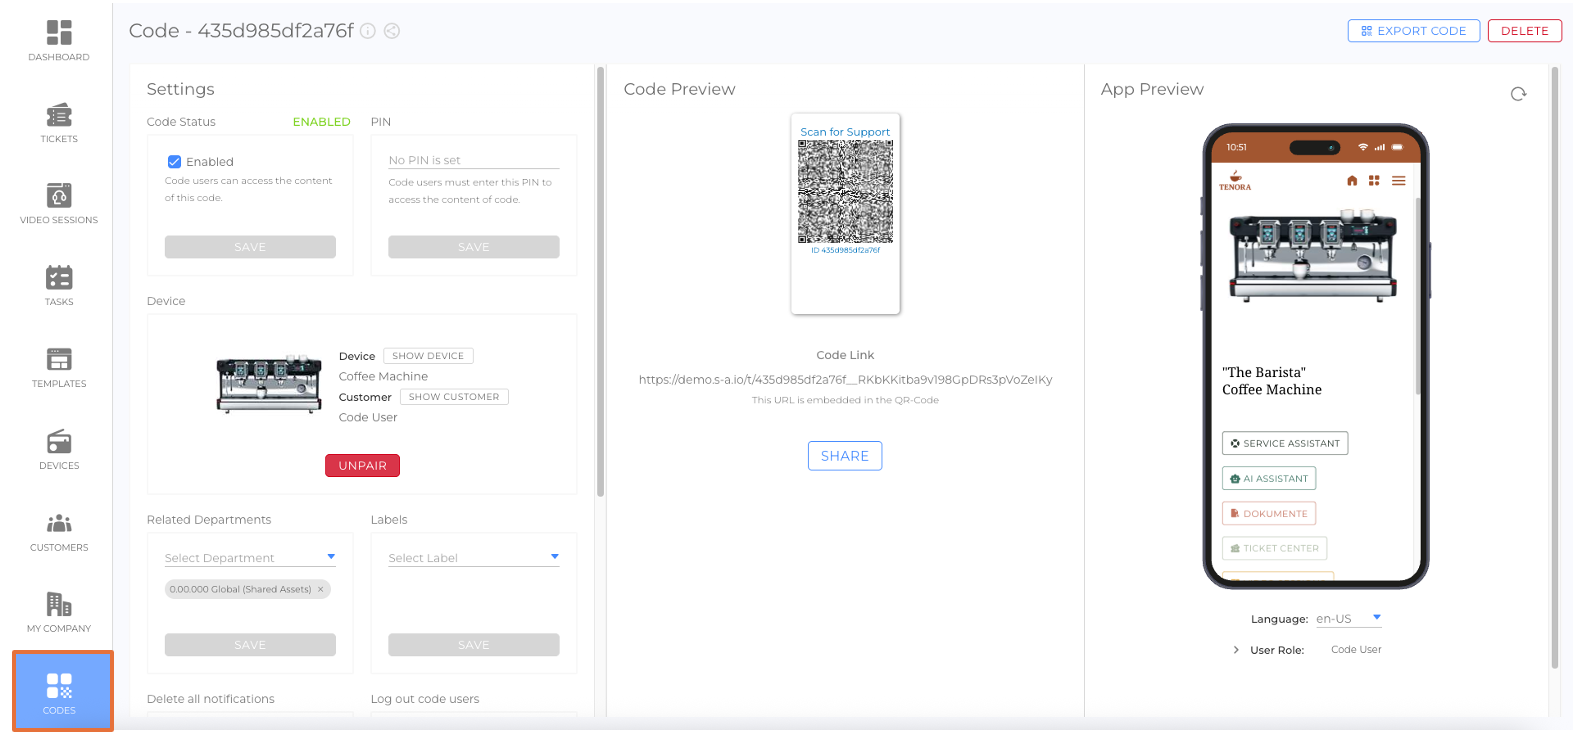
| shortId Identifying field for updates | Short-ID of an existing code (picture) xxxxxxxxxxxxxx | Short-ID |
| disabled | FALSE (Note: TRUE = disabled; FALSE = enabled) | Code Status |
| pin | 1234 | PIN |
| taggedObject | ID of an existing device (picture) xxxxxxxx-xxxx-xxxx-xxxx-xxxxxxxxxxxx (32 digits) | Device |
| relatedDepartments.X (X = 0 - ∞) 0 = 1st department 1 = 2nd department etc. | ID of an existing department (picture) xxxxxxxx-xxxx-xxxx-xxxx-xxxxxxxxxxxx (32 digits) | Related Departments |
1. Use the filters to reduce the list of codes to those you want to update
2. Export the list (select only the columns you need and export the list in machine-readable format)
Note: "shortId" is required as identifying field
3. Edit the exported CSV file and enter your changes
4. Import the CSV file
Notes on Imports
Data Entry
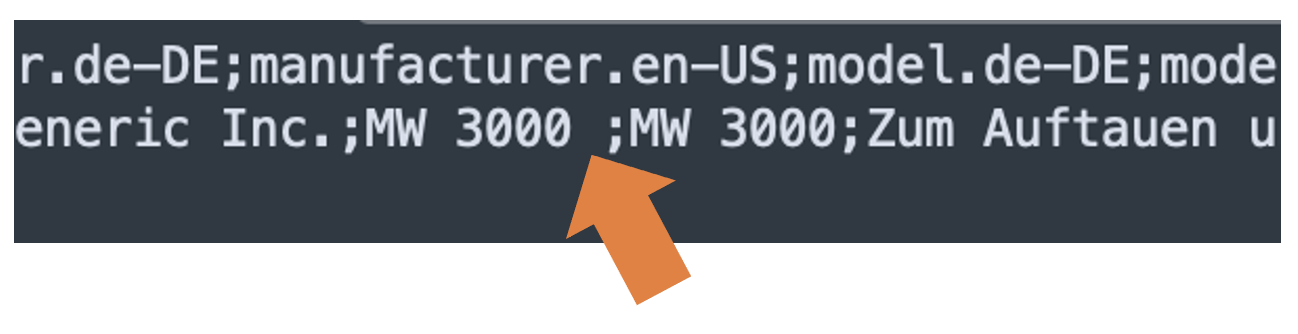
- Do not leave any spaces between your input and the separator (picture).
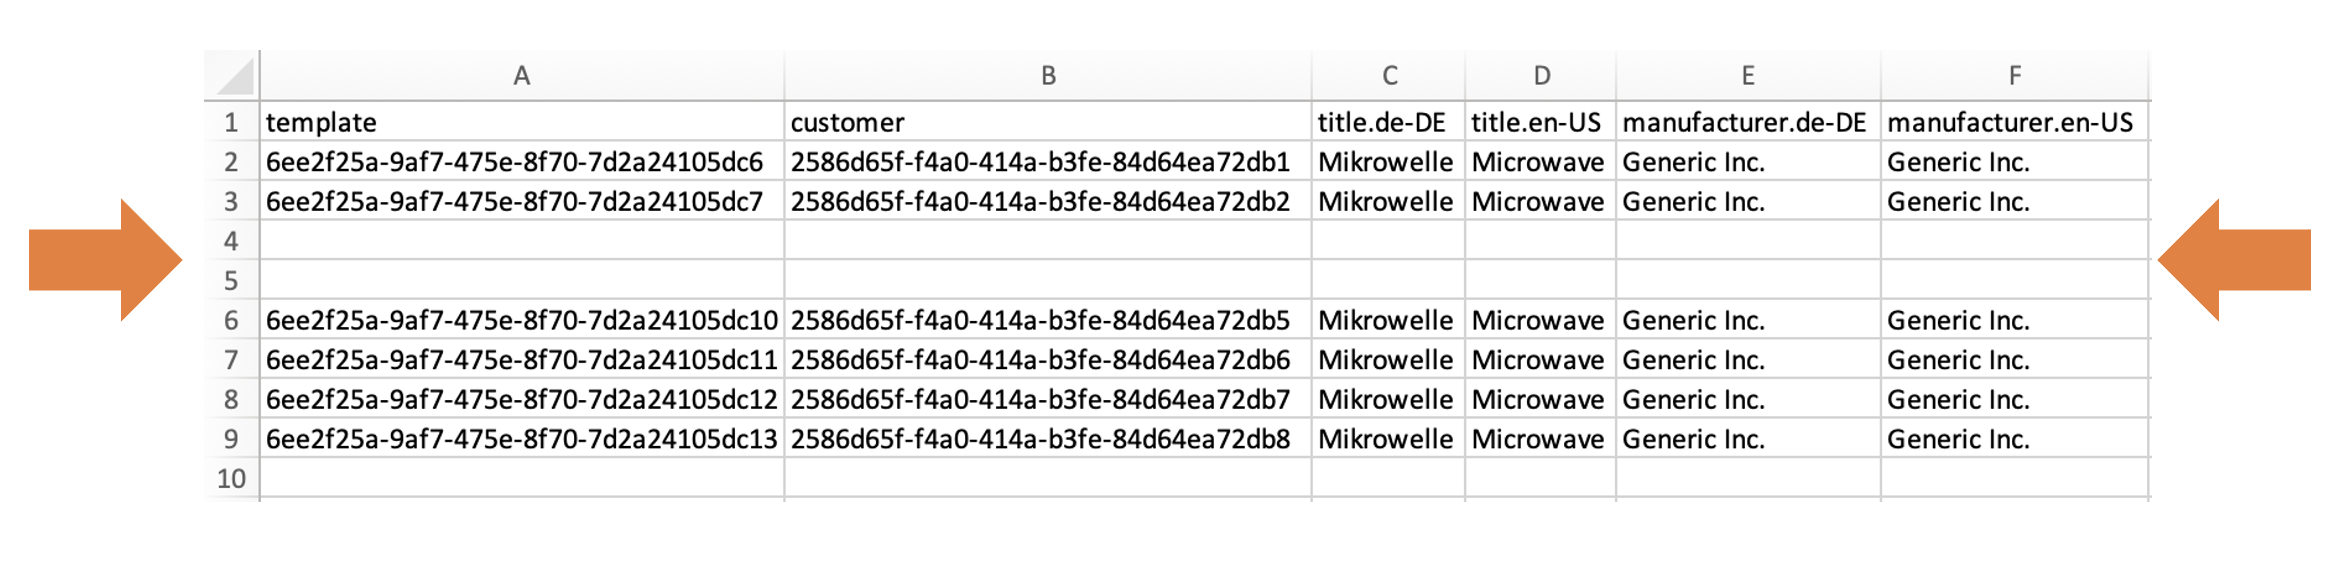
- Do not leave empty rows in your CSV data (picture).
- Do not put a comma at the end of a row (picture).
- To add related departments to an entity, always start with relatedDepartments.0 and continue with .1,.2,.3, etc. until all departments are added. The same related departments don't have to be in the same column for each entity.
- Text entries with commas need to be put in "quotation marks".
- Websites must start with https:// .
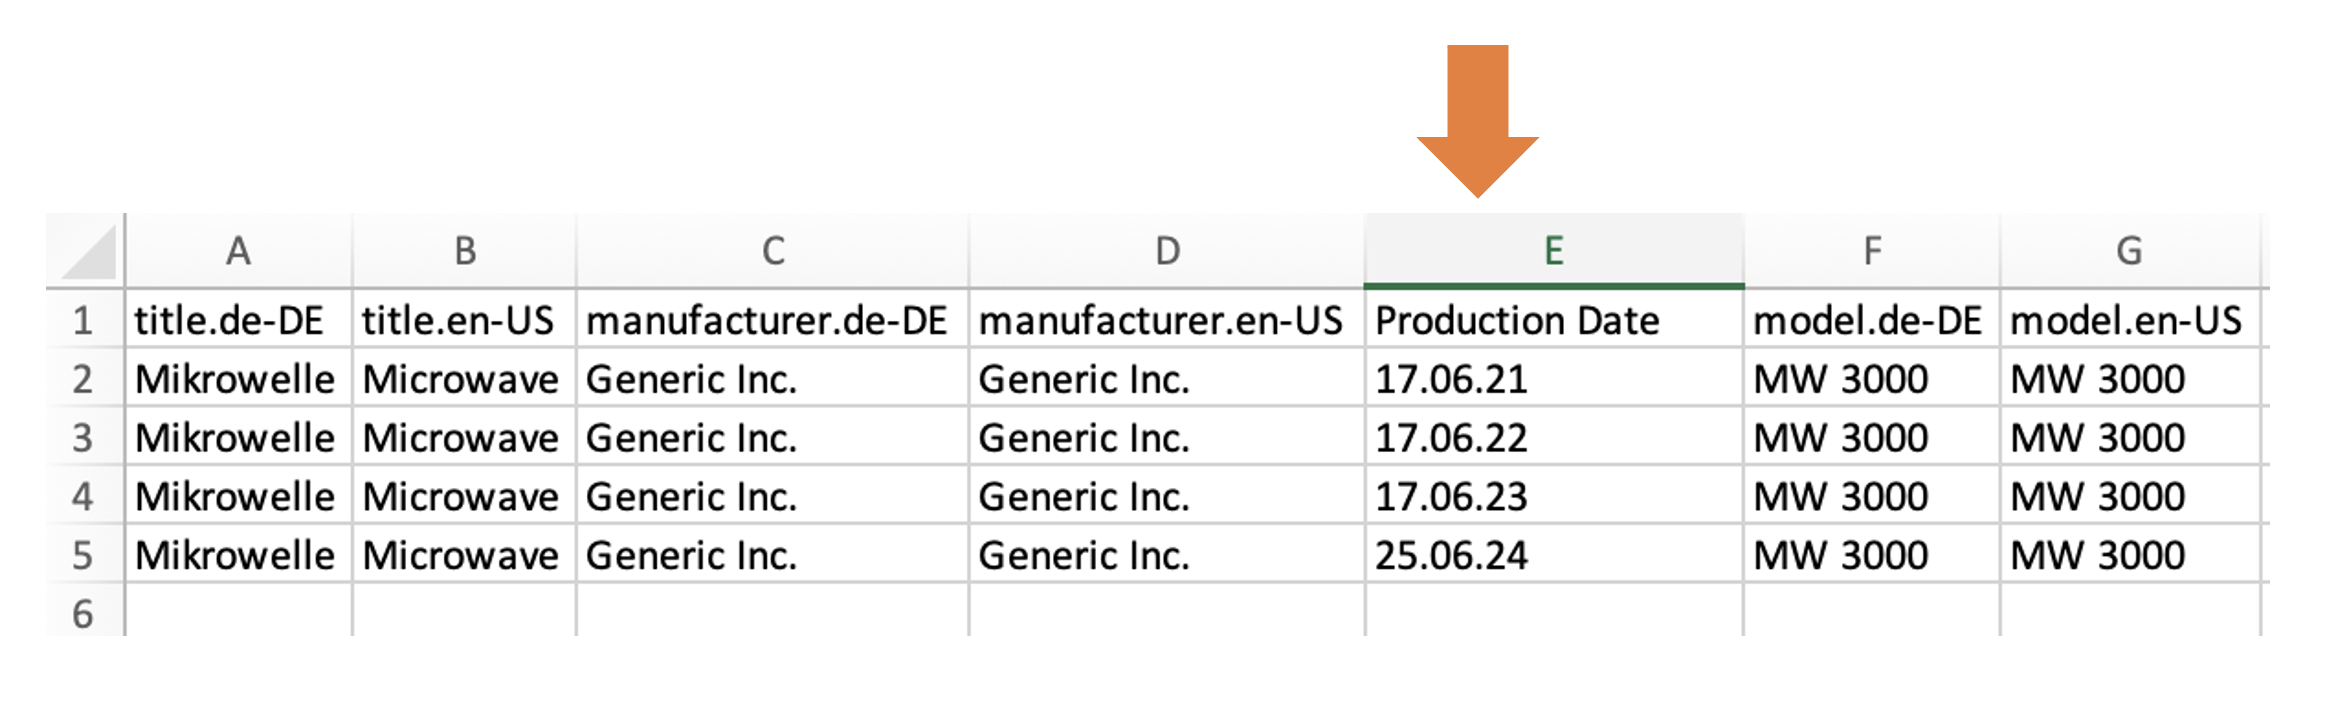
- If the column headings deviate from the specifications, these columns are ignored and their contents are not imported (picture).
- The order of the columns is not relevant.
Date Entries / Date Types
- Date entires must be formatted using an UNIX epoch timestamp in milliseconds (picture)
Tip: Use a converter (external link)
Languages
- For the system to be able to assign the content correctly, language tags (BCP47 format) must be added to column headings, e.g. ".en-US", ".de-DE", ".es", ".fr".
- To import content in multiple languages, create one column per language and input field (picture).
- Tip: To find the correct language tag, log in to the platform, select a template, click EDIT, click one of the globes next to an input field, click on the plus sign to add a new translation, open the drop-down menu next to the input field and select the language you want. The language tag will now be displayed. (video)
Excel & LibreOffice
Import CSV files with Excel macOS (example based on Excel version 16.102):
- Open a new Excel document (“Blank Workbook”).
- In the menu tab Data → Get Data → From Text (Legacy) (see example image 1).
- Select a sample file → click Import Data.
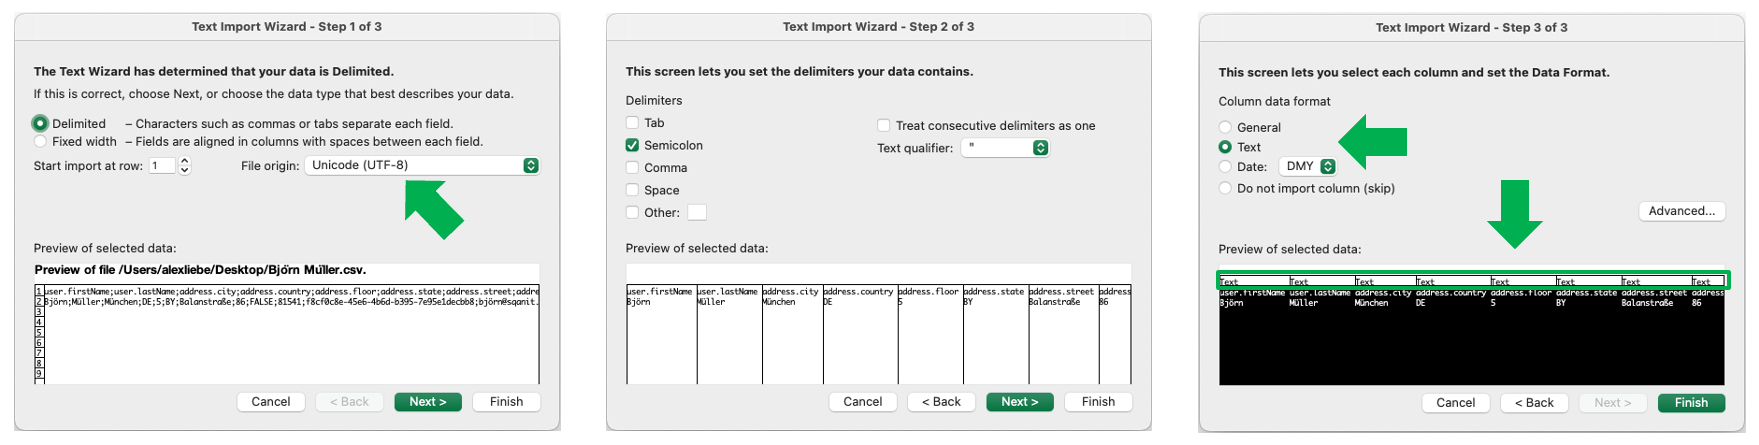
- In the Text Import Wizard – Step 1 of 3, choose Delimited, then under Start import at row select 1. For File origin, click Unicode (UTF-8) → then click Next > (see example image 2).
- In the Text Import Wizard – Step 2 of 3, select Comma as the delimiter and (double quotation mark) as the text qualifier → then click Next > (see example image 3).
- In the Text Import Wizard – Step 3 of 3, set Column data format to Text (see example image 4).
- Click Finish and then Import.


Import CSV files with Excel Windows (example based on Excel versions newer than Office 2016):
- Open a new Excel document - Blank Workbook.
- In the menu tab, select Data → Get Data → From File → From Text/CSV (see example image 1).
- Select a sample file → click Import Data.
- Under File Origin, select 65001: Unicode (UTF-8) under Delimiter, select Comma , and under Data Type Detection, choose Do not detect data types.
- Then click Transform Data (see example image 2).
- Open the Transform tab → select Use First Row as Headers → dropdown arrow → Use First Row as Headers again (see example image 3).
- Choose Comma as the delimiter.
- In the preview, select all columns and choose Text as the data format.
- Then go to File → Close & Load (see example image 4).


For more information, visit the Microsoft Support website (link).
Import CSV files with LibreOffice for macOS and Windows (example based on LibreOffice version 25.8.2.2):
- Open your LibreOffice application.
- Select Open File (see example image 1).
- Choose a sample file → click Open.
- In the Text Import menu:
Under Import → Character set: select Unicode (UTF-8) and under From row: choose 1.
Under Separator options → select Detected (,) and for String delimiter: choose ".
Under Other options → select Detect scientific notation.
Note: On Windows, under Field options, set the Column type to Text, and in the preview, select all columns (Ctrl + Alt + A) (see example image 2). - Click OK.


Note: The steps and recommendations described here are provided solely as examples to facilitate working with Excel and LibreOffice. They do not constitute binding instructions. Use at your own risk.
Import Size
- You can create or update up to 5000 entities per import.
- If you want to create or update more than that, just do another import.
Common Mistakes
| Problem | Possible Cause | Possible Solution |
|---|---|---|
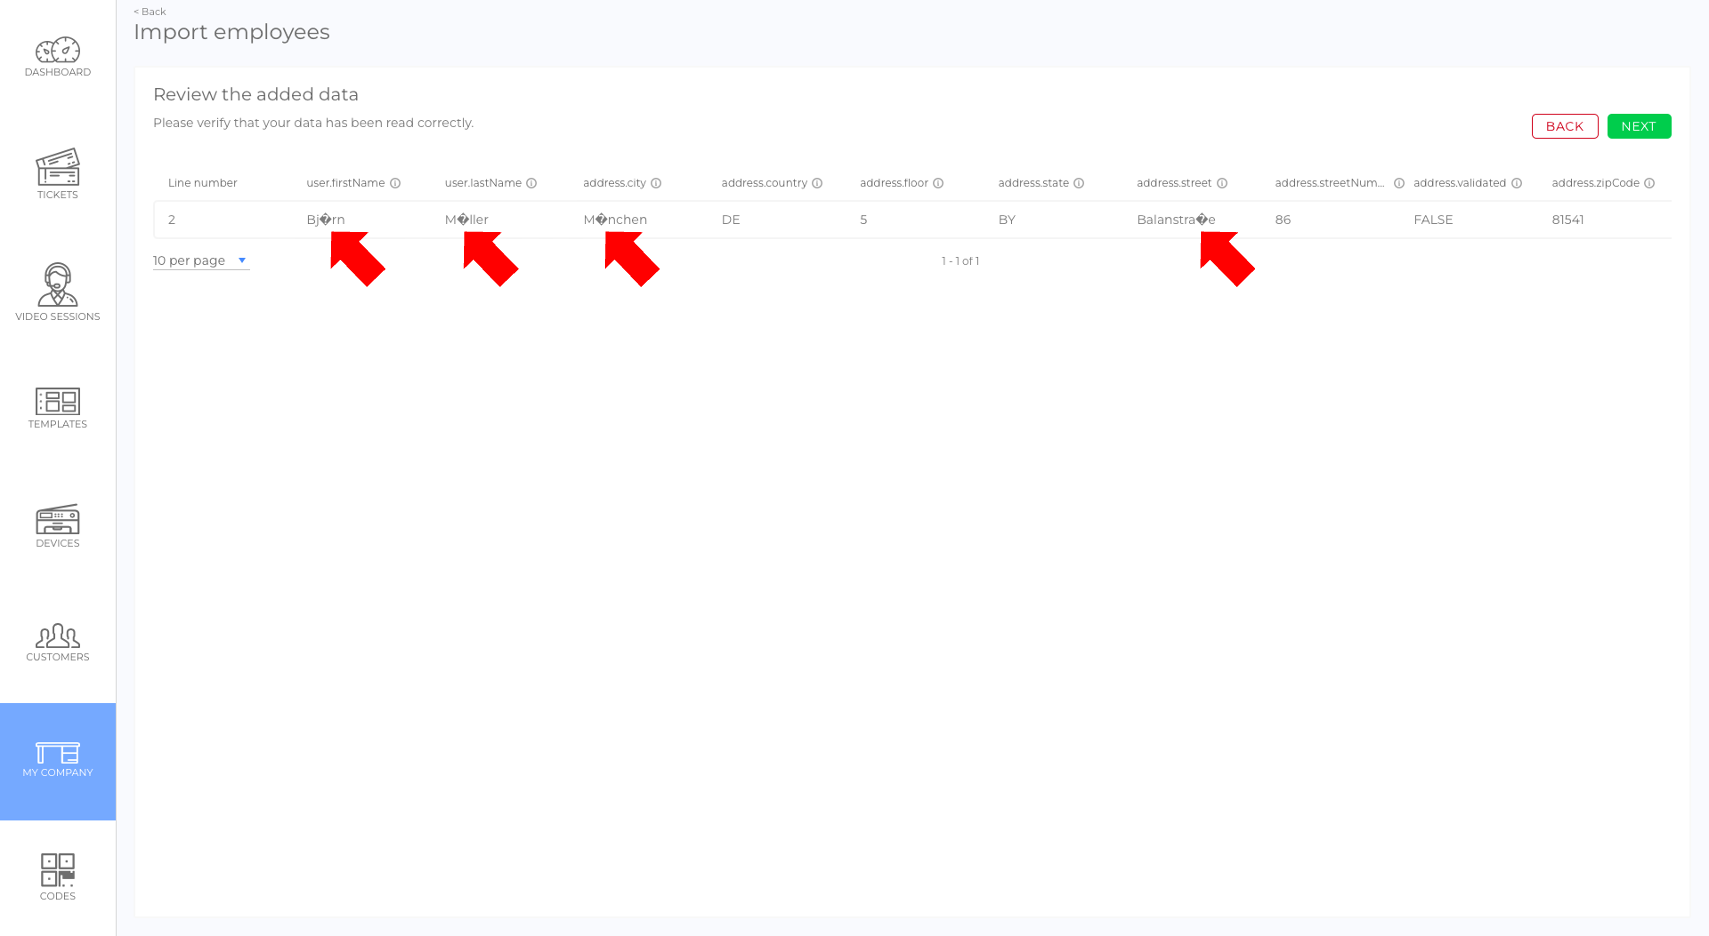
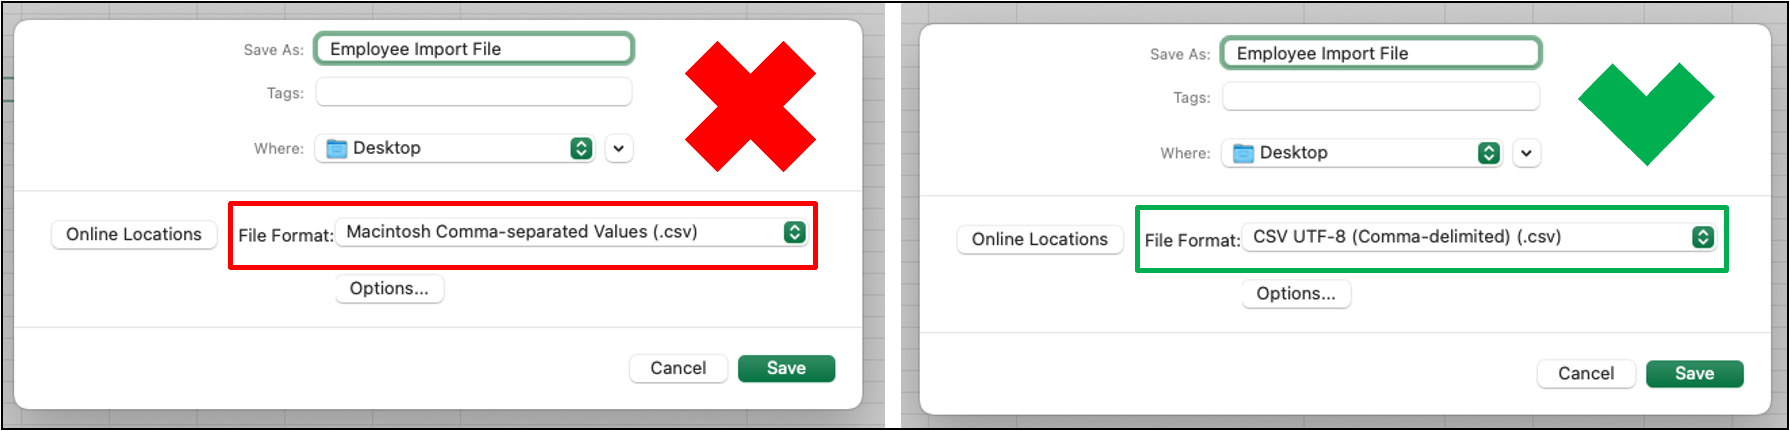
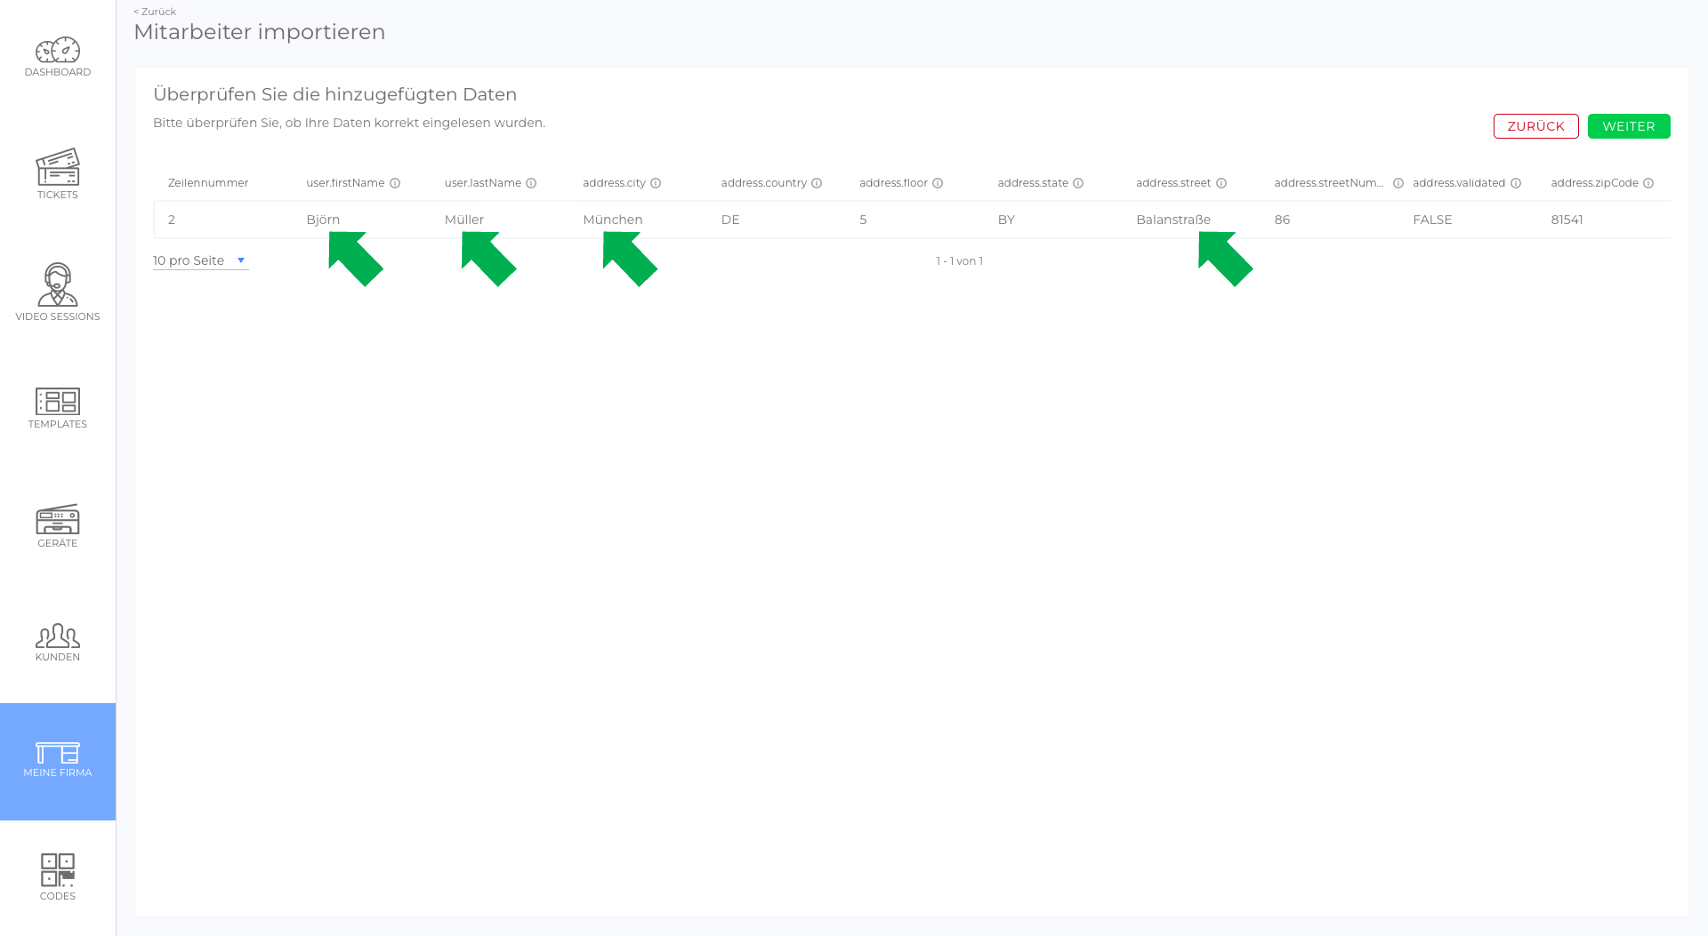
| Accented characters (e.g., â, é, ö, ü) and other special characters such as "ß" are displayed incorrectly (picture). | Import file not formatted correctly (picture). | Use UTF-8 format only (picture). |
| Error messages next to empty input fields (picture). | Whitespaces | Remove all whitespaces from "empty" input fields. |
| Leading zeros are missing. 001234 --> 1234 | Columns not formatted correctly. | Set the column formatting to "Text" (picture). |
| Functions, e.g., address validation, aren't turned on/off as expected. | "TRUE"/"FALSE" has been translated into another language. | Use "TRUE"/"FALSE" only. |
The Export
Why use Exports?
Since the lists can be easily filtered and sorted on the platform, it is obvious that there is a need to be able to use these prepared lists outside the application, e.g. for reports. In addition, exports can be used to generate import files for updates.
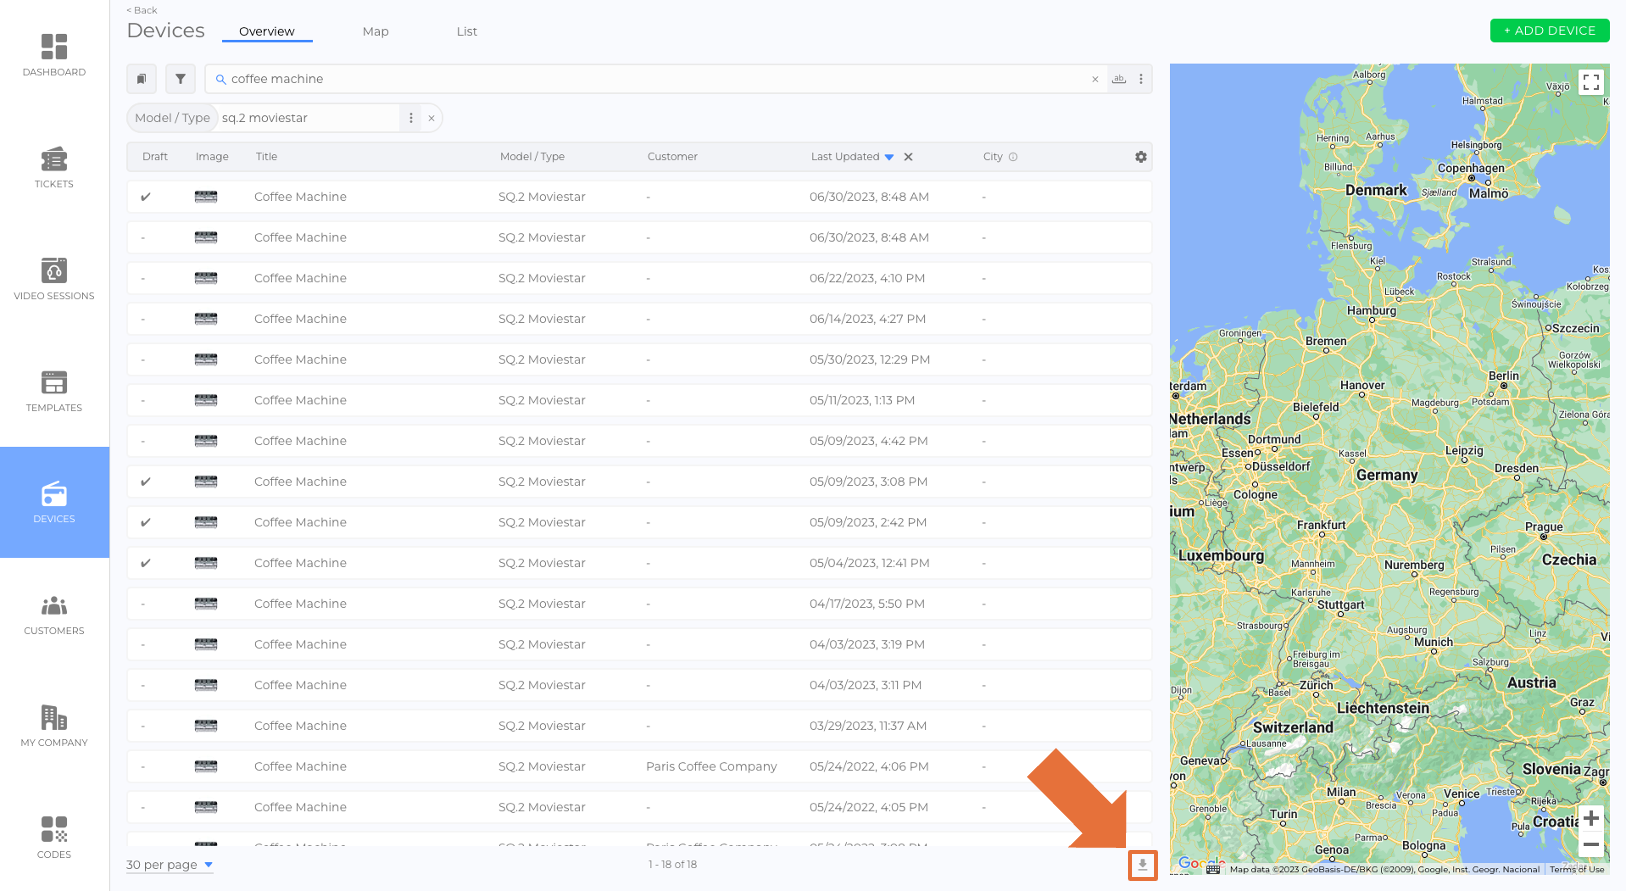
- Any list in the application can be exported via the download button (picture)
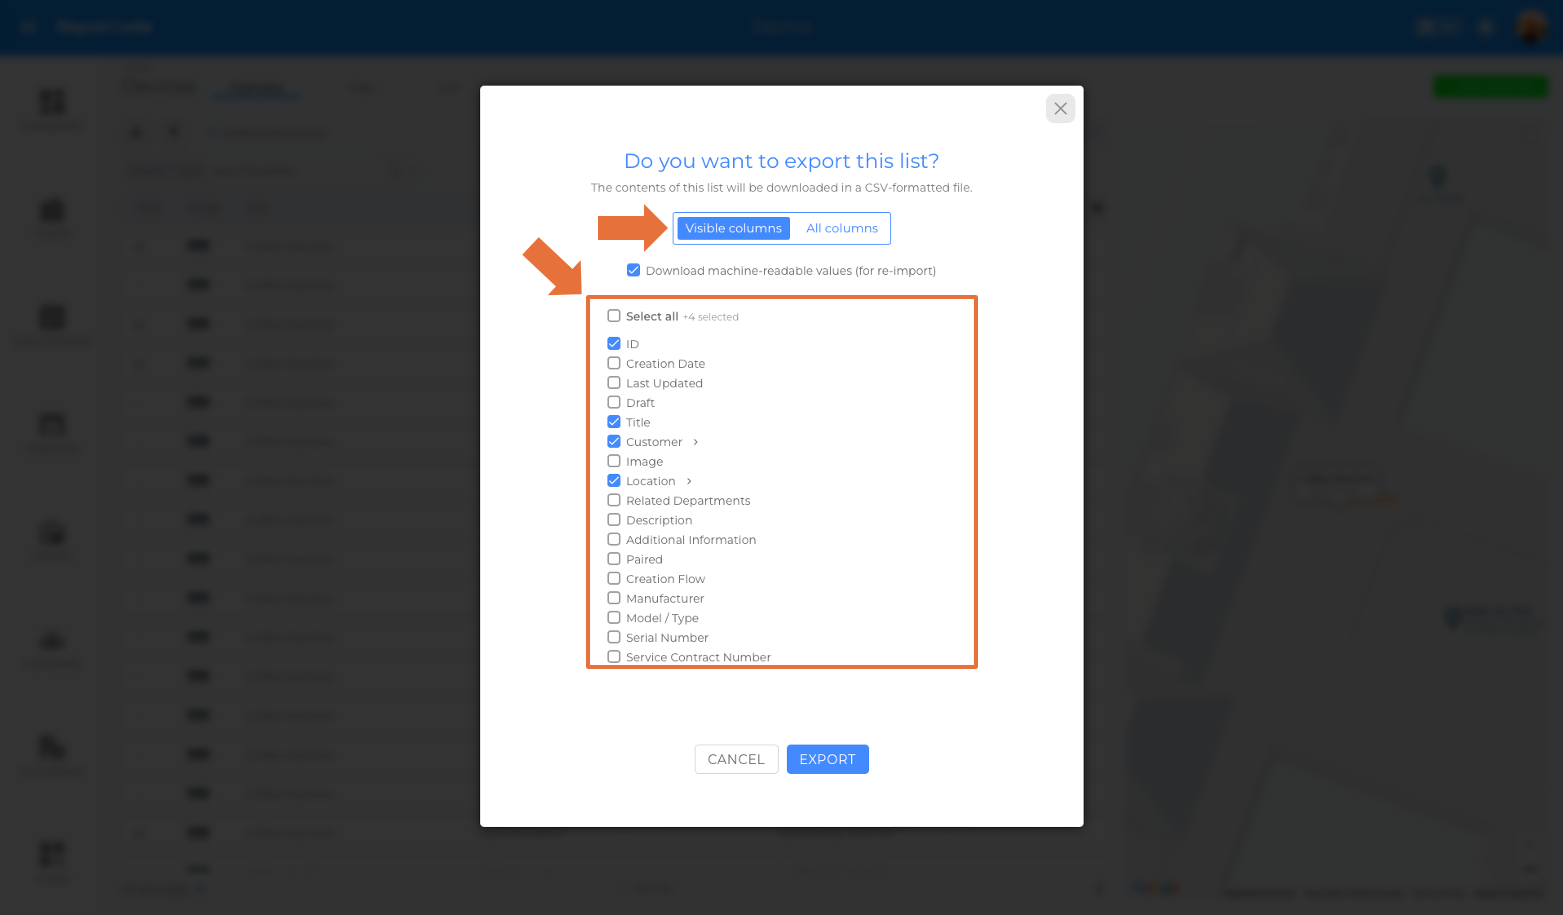
- Exports can include a user-defined selection of columns or all columns (picture)
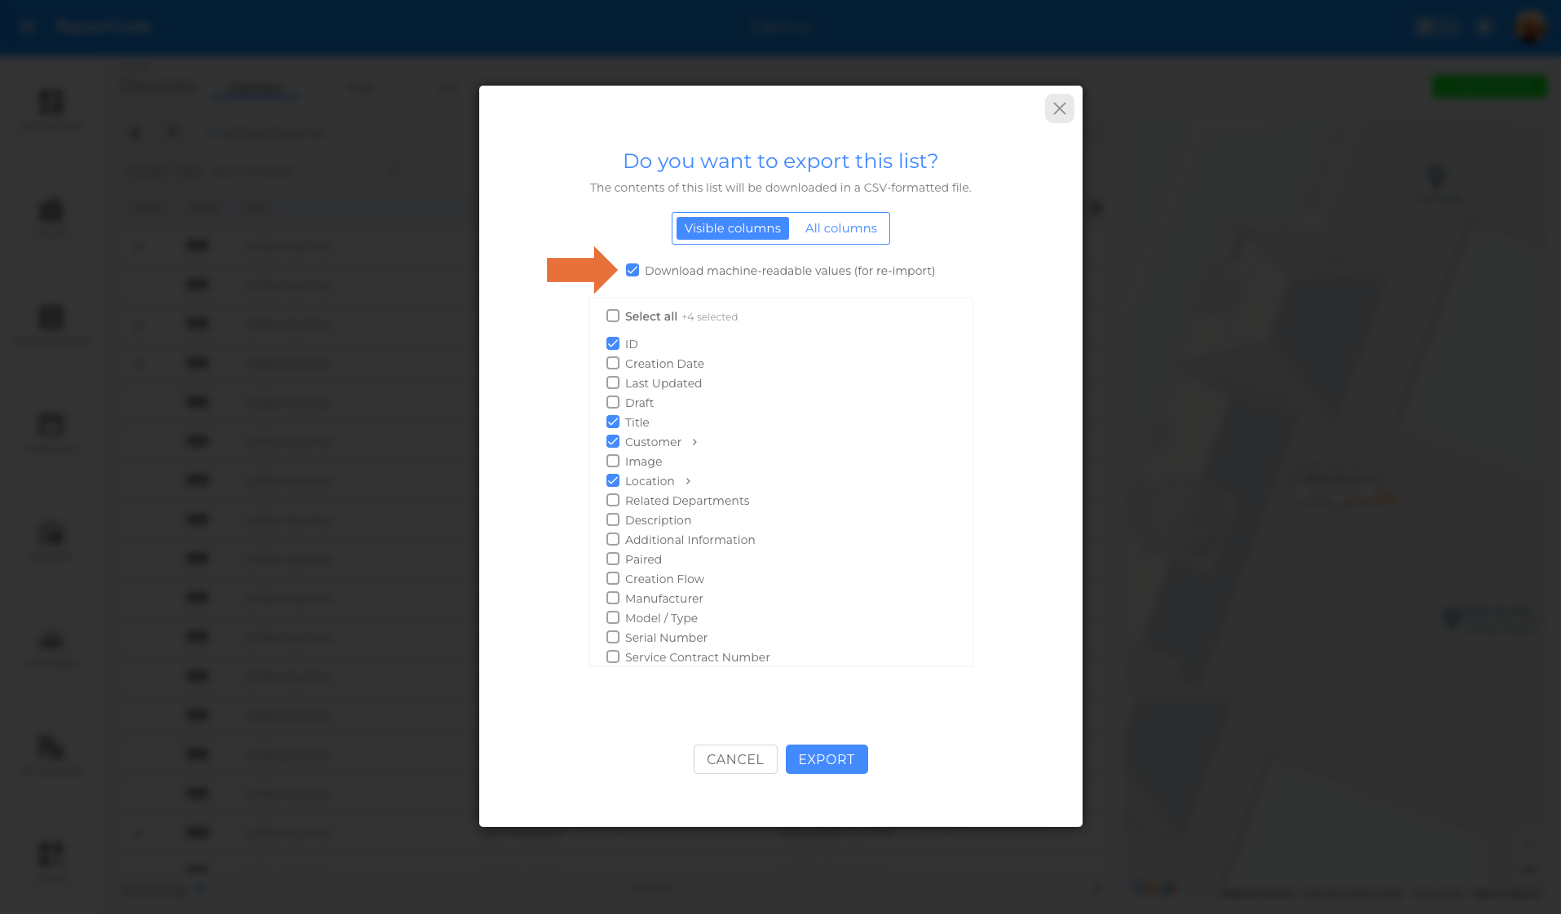
- Exports can be created in a human-readable or machine-readable format (for re-import) (picture)
How to use Exports for Updates
- Go to the list of entities that you want to update (e.g. Devices)
- Filter the list so it will only show the entities you want to update (optional)
- Click the download button (found at the bottom of the list)
- Select the columns that you want to update and download them as machine-readable values
- Open the CSV file and make your changes
- Verify that the list has an identifying field and that all your entities have an entry in it (see tables above)
- Verify that all column headers are still formatted correctly
- Save the file as a CSV file (UTF-8)
- Upload/Import the CSV file to the platform
 We use cookies on our website to give you the most relevant experience by remembering your preferences and repeat visits. By clicking “Accept All”, you consent to the use of ALL the cookies. However, you may visit "Cookie Settings" to provide a controlled consent.
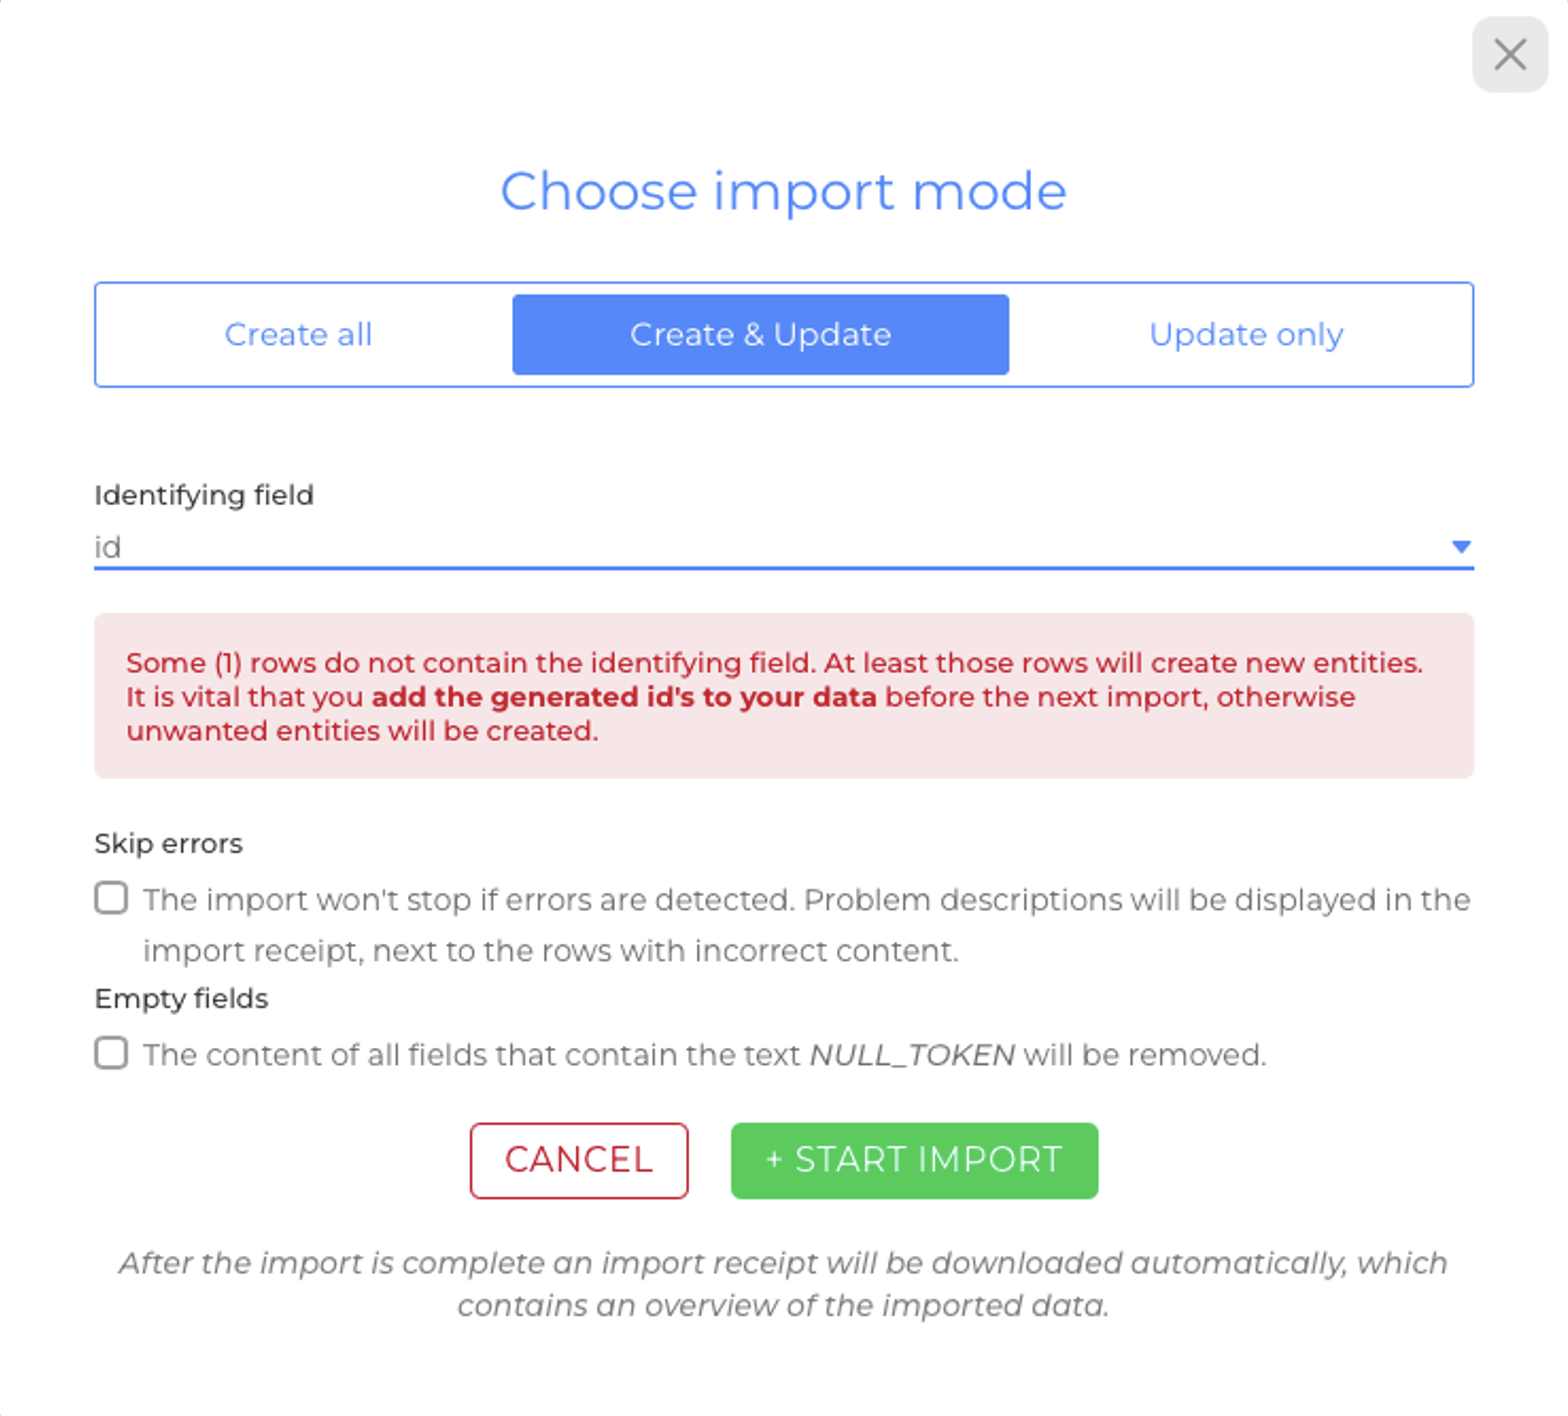